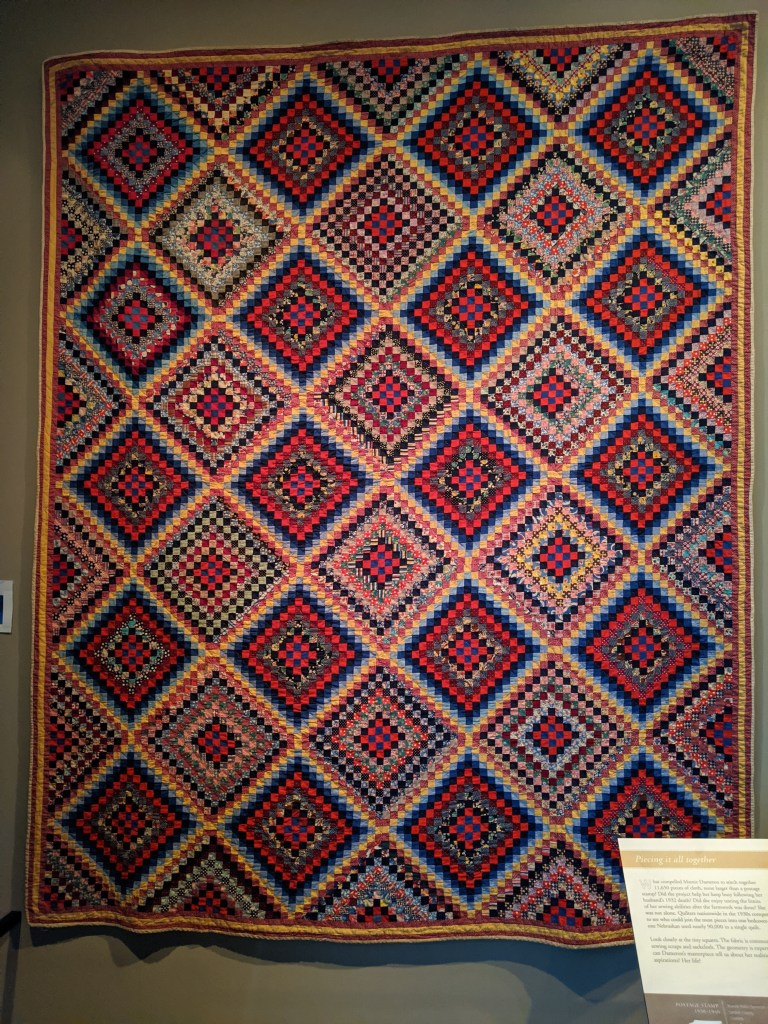
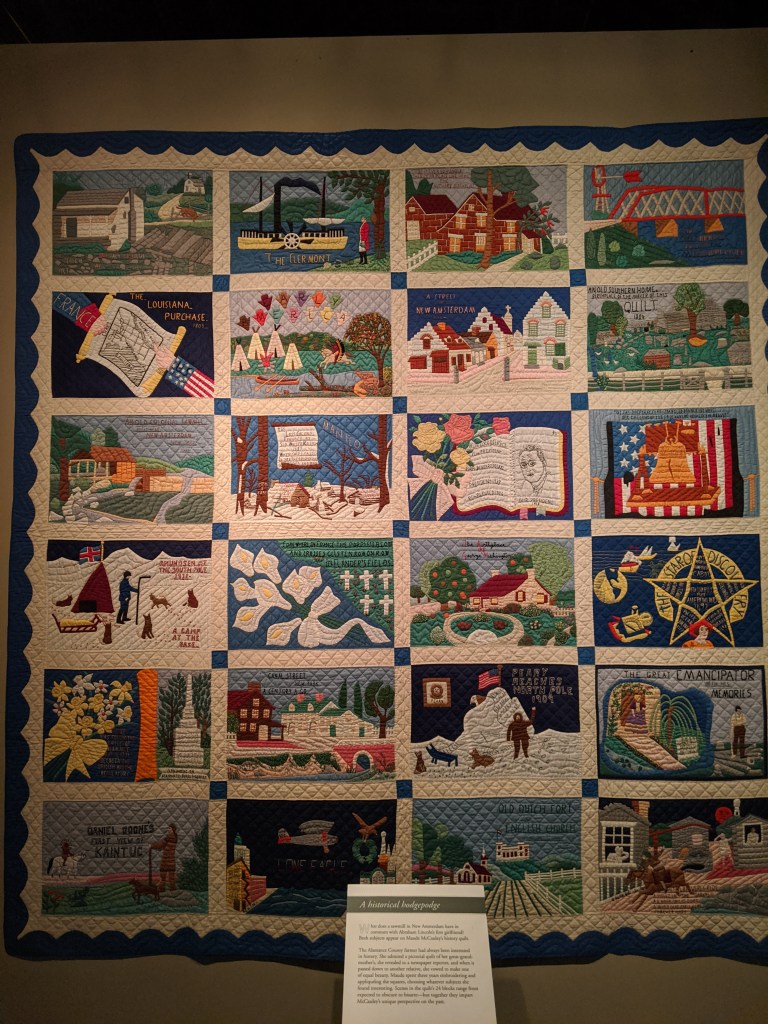
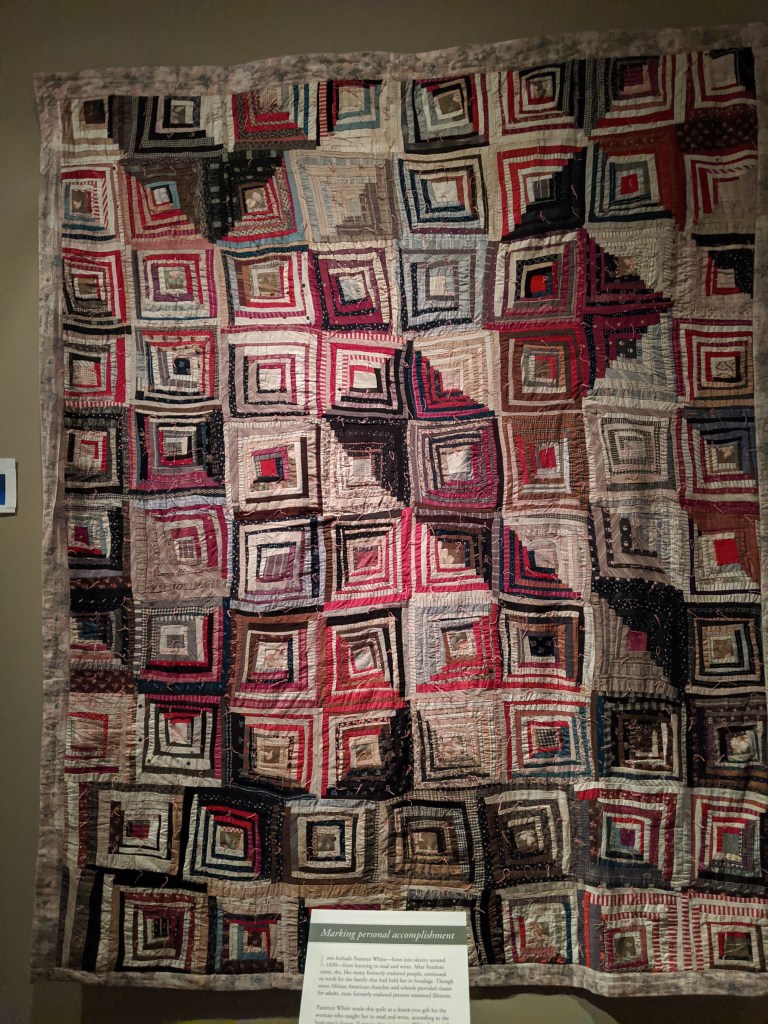
The North Carolina Museum of History has a wonderful exhibit called QuiltSpeak: Uncovering Women’s Voices through Quilts that will be there until early March 2020. There are some stunning quilts on display, so if you are in the Raleigh area, you will definitely want to check it out.
The exhibit features about 40 quilts, along with a story of the woman who created it. Here’s a few pictures to give you and idea of the type of craftsmanship on display.
Wow, can’t believe it has been over a year since I posted something! I’ve been busy sewing and doing projects, but just haven’t had the time to take pictures and put together the posts. I plan to start posting a bit in 2016.
I signed up for a UFO challenge at my local quilt shop and I hope to complete ten UFOs by March 31! I think I have a good chance of getting 8 completely done, and two will just have some progress made. Will post a list of the projects in the next few days so you can can see what I’ve been up to this past year.
Five years ago, my brother gave me a box of 3.5″ and 6″ squares cut from vintage Hawaiian shirt fabric and asked me to make a quilt. I found the perfect pattern in the ScrapTherapy book by Joan Ford. I’ve worked on it off and on for the past few years, and finally finished it!
This quilt has over 1,000 separate pieces and lots of triangles. I tried to set up somewhat of an assembly line to sew and trim the half-square triangles. Every few months, I would pull out the project and do a few more half-square triangles.
The best part was figuring out which squares to pair with the half-square triangles in order to make the fish. I think the fish turned out great and I really like how the blue fabric makes them pop!
What long-term project have you finally finished? Comment below!
Pincushions are a great project since they are small and only take a few hours to make. Plus, you can never have too many! This tasty treat is from Miss Rosie’s Fruit Salad pattern.
So far so good, I’ve been able to quilt at least 20 minutes a day in Feb. It’s only day 4, but I feel very optimistic about being able to do this. I am going out of town for a few days in Feb, and am already planning what project I can take with me. It will probably be one of my embroidery or wool appliqué WIPs.
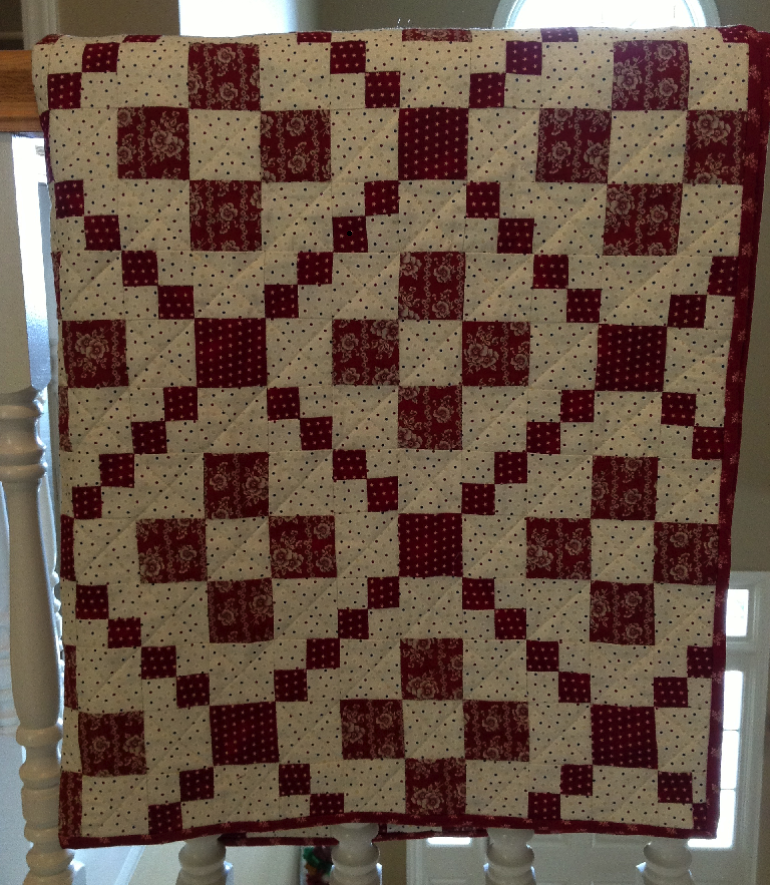
If you recall, my first quilt was a red and white Irish Chain quilt with a blue border. I removed the blue border since it didn’t really add anything and I think it looks much better as just a red and white quilt.
Finished Irish Chain!
Meandering Stitches did the quilting for me. I stitched on the binding this weekend. I think it looks great!
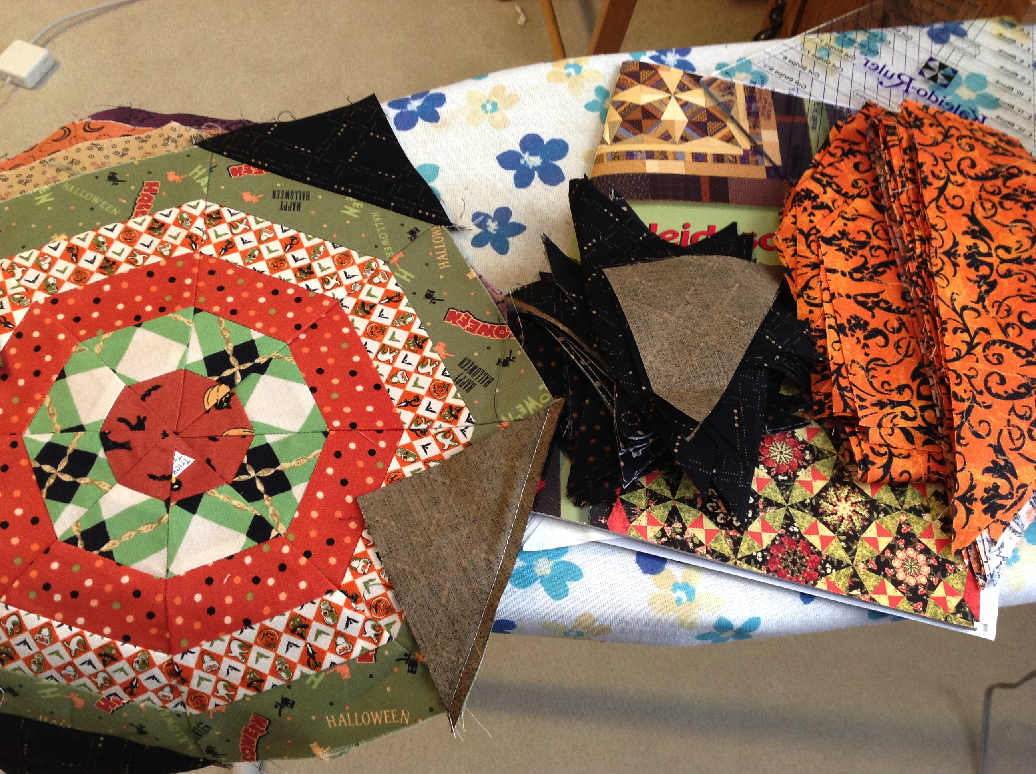
I also finished cutting out all the sashing for a Halloween Quilt I started last September. Now that everything is cut out, it shouldn’t take too long to put together. Here’s a teaser of what it looks like.
I’ve been working on a table topper from the Summer 2012 issue of Primitive Quilts and Projects that features both piecing and applique. The background pieces were cut out a few weeks ago and I spent the past week piecing them together. I felt really triumphant when I completed it on Saturday. The plans was to start work on the applique part on Sunday. However, after looking at it closely, I spotted a mistake….
Can you spot the mistake?
I felt I could live with it, but after sleeping on it I decided I couldn’t! I spent a few hours Sunday fixing it, but it was worth it. Below is the corrected background. The applique work can wait until next weekend.
Corrected background.
Just for fun, let’s turn this into a giveaway. The prize is a cute little cupcake pincushion (color may vary).
Giveaway Prize – Cupcake Pincushion
Post a comment below with what you think mistake is and how you would fix it. All comments will be included in the drawing (even the ones that don’t have the correct answer). Deadline for comments is Sunday, August 5th. Winner will be notified via email and announced on the blog.
I love books about sewing and quilting and wanted to share a few of recommendations with you. There are so many books out there, it’s hard to know which one to get. This list is by no means complete, but if you are looking for some good basics to include in your library, check out the following books.
For some good beginner quilt books, I recommend the “Quilter’s Academy” series by Harriet Hargrave and Carrie Hargrave. Right now she has three books in the series (Freshman Year, Sophomore Year, and Junior Year), and the fourth book will be published in May. These are excellent books and they will take you through the quilting processes step by step. Each book builds on the one before, so if you want to get your Bachelor’s in quilting, these are a necessity. I wrote a review of the first book in this series – so read that for more information.
Hand-pieced Wall Hanging
If you are interested in making quilts by hand, I recommend “Quiltmaking by Hand” by Jenny Beyer. This is also an amazing book and takes you through each step of the hand piecing and hand quilting process. Hand piecing can be fun and relaxing if you aren’t in a huge hurry to finish the project. I hand pieced this wall hanging a few years ago (still need to hand quilt it though!). The book has lots of pictures and clearing explains the specific techniques needed for each phase. Of course, I highly recommend Allie Aller’s Crazy Quilting as well, and posted a review of this last year.
If you like crazy quilts, check out “The Magic of Crazy Quilting” by J. Marsha Michler. This book includes several techniques for piecing the crazy quilt foundation, information on embroidery stitches, embellishments, and transfers, and several crazy quilting projects. The book has tons of pictures and a gallery of quilts at the end. You definitely will get a lot of ideas just looking at the pictures! She also has a companion book called “Motifs for Crazy Quilting” that includes hundreds of embroidery designs for your crazy quilts.
For a general quilting reference book “The Better Homes and Gardens Complete Guide to Quilting” is a must have. This includes lots of pictures so the techniques are easy to understand. This is my go-to book when I have a question about how to do something or just a need a quick reminder.
What books do you recommend? What books do you have your eye on?
I’m back from my trip to…. Barcelona! Work was the primary reason for going, but I managed to have two whole days of sightseeing. I walked from one end of the city to the other and had a great time looking at all the beautiful parks, buildings, churches, and quilt shops! Yes, that’s right, Barcelona is home to at least 12 quilt shops (more if you count stores outside the city center) and my plan was to visit all of them. This website – www.cosman.nl – lists quilt shops in Europe and I used this to generate an itinerary. Since I have so much to tell about my trip, I will split this into two posts – one today and one tomorrow, so be sure to check back!
Mouth-watering Gelato!
First, a brief word about the food, specifically the treats! I am not a huge foodie, but I do love cakes, candy, and ice cream. Barcelona does not disappoint, you can find some type of candy store, gelato parlor, or bakery on every corner! The treats are arranged in eye catching ways and you can’t wake by too many of them without eventually being tempted to stop and indulge.
Bakery Near Hotel
This bakery was next to my hotel and I stopped in each evening to pick up a little something to enjoy before going to bed. Meringue is very popular there and it is usually dipped in chocolate or flavored with some type of fruit.
Delicious Candy!
My first chance at sightseeing was on Friday night. I was done with my business and had an evening to my self. I wandered around the Gothic and Las Ramblas districts since they were close to my hotel. I stumbled upon a chamber orchestra practicing Vivaldi’s Four Season in a beautiful cathedral. They were giving a proper concert later that night, but the rehearsal was open and it sounded as beautiful as an actual concert.
Concert rehearsal in cathedral
When I walked out of the cathedral, I found myself in the middle of festive processional. The procession was headed by these large figurines – they are basically large puppets and someone gets inside the base and navigates the figure. A children’s band plays music and they throw out candy to the spectators! I followed them for a few minutes and then headed back to the hotel for the night.
Festive Procession in Gothic Quarter
Saturday was the day earmarked for the whirlwind quiltshop tour. Unfortunately, due to jet lag I didn’t start until about 11am, which was a problem since on Saturdays many of these shops close at 2pm! I did manage to visit a few shops – Nunoya, Fet a Ma, and Lola Botona, but not see as many as I would have liked.
Lola Botona Quilt Shop
I am most disappointed I didn’t get to go inside Dona as this was the largest by far and the display windows (see picture above) were packed with projects and ideas.
Dona Storefront
This picture on BCN Patchwork’s gate is adorable. Too bad this is the only thing I could see!
BCN Patchwork Storefront
However, from the few shops I visited, it was obvious that things were way out of my price range. Basically, these shops have the same fabric available in the states – Moda, Robert Kaufman, Batiks, etc. but it is $25 a yard, versus the $10 – $12 a yard! They also have the same books — but again, these are priced at least double. There was a very simple pincushion pattern that would sell for $5 here, but cost $20. The shops had lots of attractive samples and I got a few ideas (you can’t take pictures in the shops so I have to rely on my memory). So for all my friends who wanted me to get you some fabric while on my trip, I am sorry to say I came back empty handed. However how about we hit up the local quilt shops and buy it for half price :)?
Baghangers Barcelona - House Purse
I did find one unexpected surprise, a purse shop called “Baghangers Barcelona.” This was a small shop packed with lots of novelty purse made out of leather. They had a pumpkin, tomato, Noah’s Ark, porcupine, and tons of other clever purses.
Porcupine and Owl Purses
Since I didn’t buy any fabric, I splurged and purchased a Mushroom House purse. I couldn’t resist how cute and colorful it was!
Mushroom Purse from Baghangers Barcelona
Well, that’s the end of Day One! Check back tomorrow for Day Two which features my trip to the Zoo!
Looking for a quick gift or a fun home dec idea? Here’s a set of Pretty Patchwork Heart Pockets that can be sewn together in about an hour. This tutorial includes directions for making both versions!
Pretty Patchwork Heart Pockets
Make a bunch of these and place in a pretty basket or bowl. Use clothespins to attach them to ribbon and create a fun garland or window swag!
Pretty Patchwork Heart Pocket - Version 1
You can use scraps for this and make them in a variety of colors – red and white for Valentine’s Day, green and white for St. Patrick’s Day, red/white/blue for Fourth of July, orange and black for Halloween, or red and green for Christmas!
Pretty Patchwork Heart Pocket - Version 2
The back features a small pocket. Tuck in a gift card or some dried flowers.
Pretty Patchwork Heart Pocket - Back View
From Fabric A cut:
Three 4.5″ squares
One 5.5″ Square
One 3.5″ x 2.5″ rectangle
From Fabric B cut:
Three 4.5″ squares
One 5.5″ Square
One 3.5″ x 2.5″ rectangle
Take one Fabric A 4.5″ square and one Fabric B 4.5″ square. Pin the squares right sides together and sew a 1/4″ seam on the right and left sides. Make two sets (Figure 1).
Figure 1 - Sew Side Seams
Cut these units into three rectangles that are 1.5″ x 4.5″. Make sure you are cutting parallel to the seams you just made (Figure 2). Do this for both sets.
Figure 2 - Cut Into Strips
Press the seams towards the darkest fabric to create two pieced units (Figure 3).
Figure 3 - Press open
Take the center rectangles and sew them to the appropriate side of the pieced units (Figure 4). Press the seams to the darks. You now have two units of alternating fabrics (A-B-A and B-A-B). Make two sets.
Figure 4 - Sew Strips to Create Squares
Take one of each type of square (A-B-A and B-A-B), make sure stripes are going the same direction, and pin them right sides together. Sew along the shorter sides with a 1/4″ seam. Do this for both sets. Cut each set into three rectangles that are 1.5″ x 4.5″. You will be cutting perpendicularly to the stripes (Figure 5). Press the seams.
Figure 5 - Sew Side Seams and Cut Into Strips
Sew the center strip to the appropriate pieced unit to make TWO nine-patch blocks (Figure 6). Do not sew the other strips to make blocks. You will now two nine-patch blocks and two sets of partial blocks.
Figure 6 - Sew Two Nine Patch Blocks
To make Version 1, sew the partial blocks onto one nine patch block (Figure 7).
Figure 7 - Create Version 1 Heart
Take make Version 2, sew the 3.5″ x 2.5″ rectangles onto one nine patch block (Figure 8).
Figure 8 - Create Heart Version 2
Set these two heart fronts aside and make the pocket. Take the remaining two of the 4.5″ squares, and press it on the diagonal right sides OUT (Figure 9).
Figure 9 - Make Pocket
Take one of the 5.5″ squares, place it right side up, and then pin one of the folded triangles on this to make the pocket. For best results, use contrasting pocket on the backing fabric (Figure 10).
Figure 10 - Pin Backing to Pocket
Pin one heart front and one heart back right sides together (Figure 11).
Figure 11 - Pin Backing and Heart Right Sides Together
Download Heart Template here. Trace onto piece of cardboard and cut out template. In order to create sewing line, place template on pinned hearts and trace around it (Figure 12). DO NOT CUT. Sew around the line you just drew – leave a 3″ opening in one side for stuffing.
Figure 12 - Trace Around Heart Template
Cut off excess fabric and leave about 1/4″ seam. Clip corner, curves, and heart center. Turn inside out (Figure 13). Stuff lightly and hand-stitch opening closed.
I always have a few wool applique projects in process at any one time. I usually cut out all the wool pieces, get the embroidery floss, and the put everything in a Ziploc bag so it can be worked on later. They are great to stitch on in the evening when watching TV or just hanging out. As you can imagine, there are a few Ziploc bags sitting in my closet!
Sharon of Liberty Rose has a great idea for organizing all these items! This project notebook features wool applique on the front and inside cover (so you have a place to keep your needles and pins) and it pretty easy to sew together (I plan to post a tutorial about how to cover the notebook sometime before the end of the year). The notebook contains zippered pouches that are the perfect size for carrying all your project supplies.
Project Notebook
The notebook is standard 3 Ring binder. I ironed fusible fleece on my stitching fabric so that the cover is more durable (especially since it will be used a lot). I did some basic applique on the front and and inside cover.
Project Notebook - Inside
I didn’t go too crazy with the embroidery embellishments, since the main purpose is functional, not decorative. My embroidery time is better spent finishing up the wool crazy block that was started a year ago! A pocket on the back inside cover can carry larger pattern books that won’t fit in the pouches.
Project Notebook - Back Pocket
Now, when traveling, I just take out a zippered project pouch, throw it in the suitcase, and am good to go. Talk about Keeping it Thimble!
In other news, look for details in the next week or so on my first published pattern. In the meantime, here are some sneak peeks: