Bags and purses are one of my favorite things to make. I have the perfect bag for almost anything. My favorites to make are roomy bags with lots of pockets and storage.
This first one is from a Quilts Illustrated a pattern. I can’t remember the fabric, but it is a lovely blue color with yellow accents. It’s just the right size for a handbag that carries a wallet, book, and a few other odds and ends.
This second one is a By Annie pattern. I love her patterns! I’ve made several of her patterns, but this is my favorite one so far. When I finished sewing the bag I used a tailor’s point press to help me press all the seams on the bag to give it a nice crisp look! The fabric is canvas weight from Melody Miller’s “Picnic” line. This is a very durable and versatile bag.
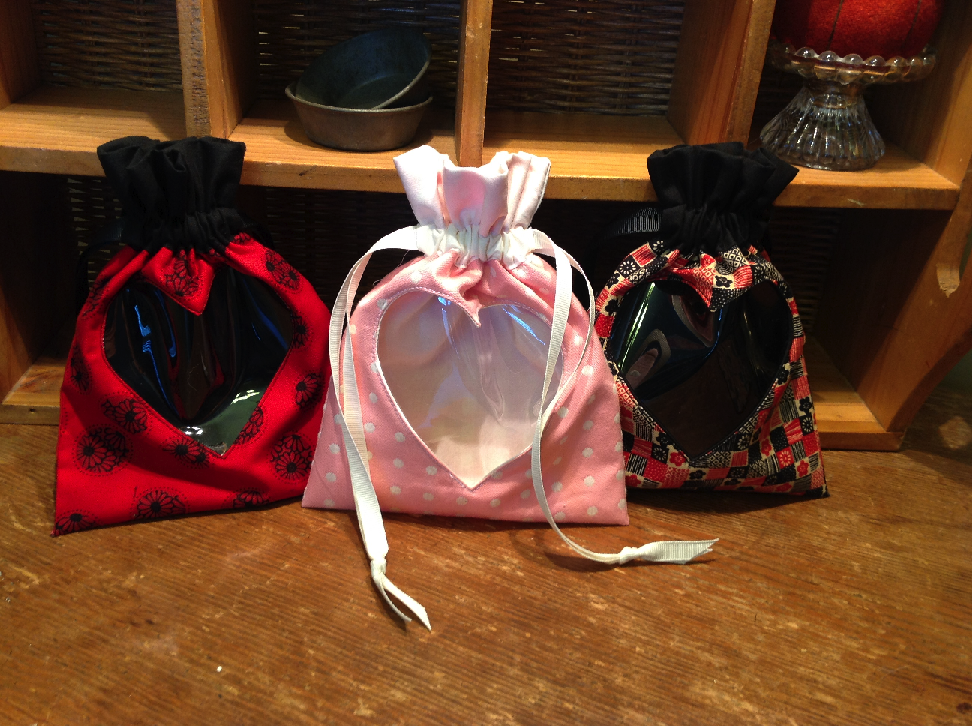
I found the tutorial for these drawstring pouches at Twinkle and Twine. They are so cute and very easy to make. I made six in one afternoon, I could have made more, but ran out of vinyl for the windows. The tutorial has great directions, even for beginners.
I plan to make these with other cut-out shapes for different occasions – a baby rattle, christmas tree, cupcake, and so on. I’m even going to make one with a thimble, of course!
June has been a busy month for me, so the blogging has taken a backseat to my real world job. However, I have been busy sewing – which is great! Regular readers will know how much I love the Professional Tote pattern by Creative Thimble. I have made a lot of these totes and I truly consider it to be the perfect bag!
Professional Tote – California Girl Fabrics
My son finished school about two weeks ago and I wanted to make a special gift for his teachers. The Professional Tote immediately came to mind. I knew that one teacher liked green and the other blue, and that they seemed to favor more modern prints, which lead me to select fabrics from California Girl (designed by Fig Tree) and Ruby (designed by Bonnie and Camillle) for their bags.
Professional Tote – Ruby Fabrics
I loved the fabrics so much, I decided to make one for myself too. Even though I have made this pattern a ton, I only have one professional tote that I use (for the beach). and it would be nice to have one for work purposes. The center zippered divider is the perfect size for carrying my iPad.
Professional Tote – Ruby Fabrics
Needless to say, while I did have all the supplies bought well in advance, I didn’t actually cut them out and sew them together until two days before. However, the sewing goes pretty fast since I am so familiar with the pattern. Of course, mine (the gray one) was put on hold until the following weekend so that I could get finish the ones for the teachers. I took them in at lunch on the last day, and I could tell the teachers were thrilled with them – and that always feel good when people like your work!
What gifts have you made that really hit the mark?
While sorting through some old fabric, this stash of Amy Butler fabric caught my eye. These pieces were set aside for another project, but I realized that they were better suited for the Bella Bag pattern from Indygo Junction. I’ve had the pattern for awhile, but never felt motivated to make it until I saw this fabric.
Bella Bag, pattern by Indygo Junction
The bag is very roomy and could easily be described as a tote bag – good for taking to the beach, library, or supermarket. The pattern is very well written and the instructions are easy to understand, but I think this is more suited for an intermediate sewer (or a confident beginner who likes a challenge). The difficulty comes when you are trying to sew the circular bottom piece onto the body of the bag.
The bottom of the bag is gathered and you have to space the gathering correctly so that the circle fits on the bottom (ie, not to large and not to small). For some reason, this was difficult, and the bottom seam is very puffy. This will probably flatten out over time or perhaps after I wash it.
Bella Bag, snapped together
The other challenge was creating the handles. You sew a tube of fabric, turn it inside out, and then insert upholstery cording. The cording has a tendency to become less compact as you pull it through the tube, so it took me a good 30 minutes to complete this step. I finally put a thick piece of scotch tape on the end of the cord to keep it from unraveling and so that it gave less resistance as it was pulled through the tube. The handles are what make the bag come together for me, I was bound and determined to get the cording in there!
The way the bag fastens is another nice feature. Magnetic snaps are on each side of the bag, so you can snap the sides together and then snap the front and back together. This is useful when you want the bag to look smaller or don’t have as much stuff in there.
Bella Bag, Interior
The buttons are from a place called Dill Buttons, and they have a wide range of fashion buttons that work great for purses and other accessories. I originally had some smaller ivory buttons on this, but they looked out of place and too small. The larger buttons look better, and the unusual shape is a nice contrast with the other patterns. I also added some top stitching on the bag body around the center seams. Top stitching always make a bag look more finished (I think).
What are some tips you have for making bags and other accessories? Any patterns you would recommend?
Please help! Sewing machines…I keep thinking about buying one. Any suggestions on a good beginner one? It’s hard to know where to start!
Signed, On Pins and Needles
I know just the machine you want – the Bernette by Bernina. Check out www.mybernette.com for a full list of the machines in this line (and just for the record, I am not affiliated with Bernina in any way). For my first machine, I had the Bernette 55 – a very basic machine that had 15 or so stitches, a buttonholer, and the basic feet and accessories.
My First Professional Tote
I knew my Bernette was made of sturdy stuff when I was able to sew through 4 layers of fabric + 4 layers of interfacing + cotton webbing when I made my first Professional Tote! The Bernette is not made in Switzerland (I think it is manufactured in China), but Bernina selected it for their beginner’s line since it meets their quality standards.
The differences between the models comes down to how many stitch choices you have, how the buttonhole function works (automatic or manual), and if everything is computerized or manual (such as changing the stitch length, needle position, etc). The more expensive ones might have a few more features such as being able to drop the feeddogs (only important if you are going to do free motion quilting). They range in price from $249 – $799. Many times you can even find a special deal for the basic machine for $199.
I definitely feel it is better to spend about $250 on a Bernette instead of buying something at a large retail chain store. In my experience, the machines at these stores are not as sturdy, powerful, or smooth as the Bernette. The one thing about Bernette is that you have to buy one at an authorized Bernina dealer. You can check on their website to find a dealer near you. The nice thing about this is that the dealer will teach you the basics of using the machine (ie, how to thread it, wind the bobbin, change stitches, and use the buttonhole).
My Bernette is a work horse and I love sewing on it. I use this machine for my classes since it more portable than my “fancy” machine. It’s also good for children and I plan to let my son use it when he wants to learn how to use the machine :).
I’m back from my trip to…. Barcelona! Work was the primary reason for going, but I managed to have two whole days of sightseeing. I walked from one end of the city to the other and had a great time looking at all the beautiful parks, buildings, churches, and quilt shops! Yes, that’s right, Barcelona is home to at least 12 quilt shops (more if you count stores outside the city center) and my plan was to visit all of them. This website – www.cosman.nl – lists quilt shops in Europe and I used this to generate an itinerary. Since I have so much to tell about my trip, I will split this into two posts – one today and one tomorrow, so be sure to check back!
Mouth-watering Gelato!
First, a brief word about the food, specifically the treats! I am not a huge foodie, but I do love cakes, candy, and ice cream. Barcelona does not disappoint, you can find some type of candy store, gelato parlor, or bakery on every corner! The treats are arranged in eye catching ways and you can’t wake by too many of them without eventually being tempted to stop and indulge.
Bakery Near Hotel
This bakery was next to my hotel and I stopped in each evening to pick up a little something to enjoy before going to bed. Meringue is very popular there and it is usually dipped in chocolate or flavored with some type of fruit.
Delicious Candy!
My first chance at sightseeing was on Friday night. I was done with my business and had an evening to my self. I wandered around the Gothic and Las Ramblas districts since they were close to my hotel. I stumbled upon a chamber orchestra practicing Vivaldi’s Four Season in a beautiful cathedral. They were giving a proper concert later that night, but the rehearsal was open and it sounded as beautiful as an actual concert.
Concert rehearsal in cathedral
When I walked out of the cathedral, I found myself in the middle of festive processional. The procession was headed by these large figurines – they are basically large puppets and someone gets inside the base and navigates the figure. A children’s band plays music and they throw out candy to the spectators! I followed them for a few minutes and then headed back to the hotel for the night.
Festive Procession in Gothic Quarter
Saturday was the day earmarked for the whirlwind quiltshop tour. Unfortunately, due to jet lag I didn’t start until about 11am, which was a problem since on Saturdays many of these shops close at 2pm! I did manage to visit a few shops – Nunoya, Fet a Ma, and Lola Botona, but not see as many as I would have liked.
Lola Botona Quilt Shop
I am most disappointed I didn’t get to go inside Dona as this was the largest by far and the display windows (see picture above) were packed with projects and ideas.
Dona Storefront
This picture on BCN Patchwork’s gate is adorable. Too bad this is the only thing I could see!
BCN Patchwork Storefront
However, from the few shops I visited, it was obvious that things were way out of my price range. Basically, these shops have the same fabric available in the states – Moda, Robert Kaufman, Batiks, etc. but it is $25 a yard, versus the $10 – $12 a yard! They also have the same books — but again, these are priced at least double. There was a very simple pincushion pattern that would sell for $5 here, but cost $20. The shops had lots of attractive samples and I got a few ideas (you can’t take pictures in the shops so I have to rely on my memory). So for all my friends who wanted me to get you some fabric while on my trip, I am sorry to say I came back empty handed. However how about we hit up the local quilt shops and buy it for half price :)?
Baghangers Barcelona - House Purse
I did find one unexpected surprise, a purse shop called “Baghangers Barcelona.” This was a small shop packed with lots of novelty purse made out of leather. They had a pumpkin, tomato, Noah’s Ark, porcupine, and tons of other clever purses.
Porcupine and Owl Purses
Since I didn’t buy any fabric, I splurged and purchased a Mushroom House purse. I couldn’t resist how cute and colorful it was!
Mushroom Purse from Baghangers Barcelona
Well, that’s the end of Day One! Check back tomorrow for Day Two which features my trip to the Zoo!
Need a new spring purse or tote? Check out Quilts Illustrated pattern for the Mini Bow Tucks Tote. I finished mine this week and was very happy with the results. The pattern is well-written and easy to follow.
Halloween is a week away and I still need to make my son’s costume. He is going as the Grim Reaper. He has no idea what the Grim Reaper does, but he assures me he will be a “nice” one. I am going to call him the “Grin Reaper” :).
The costume is basically a black robe with a hood. We will paint his face to look like a skull and he has a kid’s size scythe he will be carrying (to be honest, the scythe was the selling point of the costume for him).
In the sprit of the season I wanted to remind you that I have a free pattern available for a trick or treat bag. It’s pretty simple to make, and it makes a nice tote back if you do it in different colors.
It’s a busy week as I get ready for the Porch Sale on Oct 14th. Here are a few sneak peeks – as you can see there is still a bit of work to be done!
Witches
Odds and Ends
More Odds and Ends
I also got this steam press today. I used one of these a long time ago in a class and found it is wonderful for ironing interfacing onto fabric and saves so much time! Since I am making things in bulk, I need to find ways to save time.
The first draft of Carry All Project Tote pattern is almost completed. A few testers are lined up, so they will help me fine tune the directions. I am teaching a class on this tote at the Whistle Stop Quilt Shop in Cary, NC on September 10.
Carry All Project Tote
Please call or visit the shop if you want to sign up. You should be able to finish the project in class (if you do your homework beforehand!). The shop has the supply list and the homework assignment: