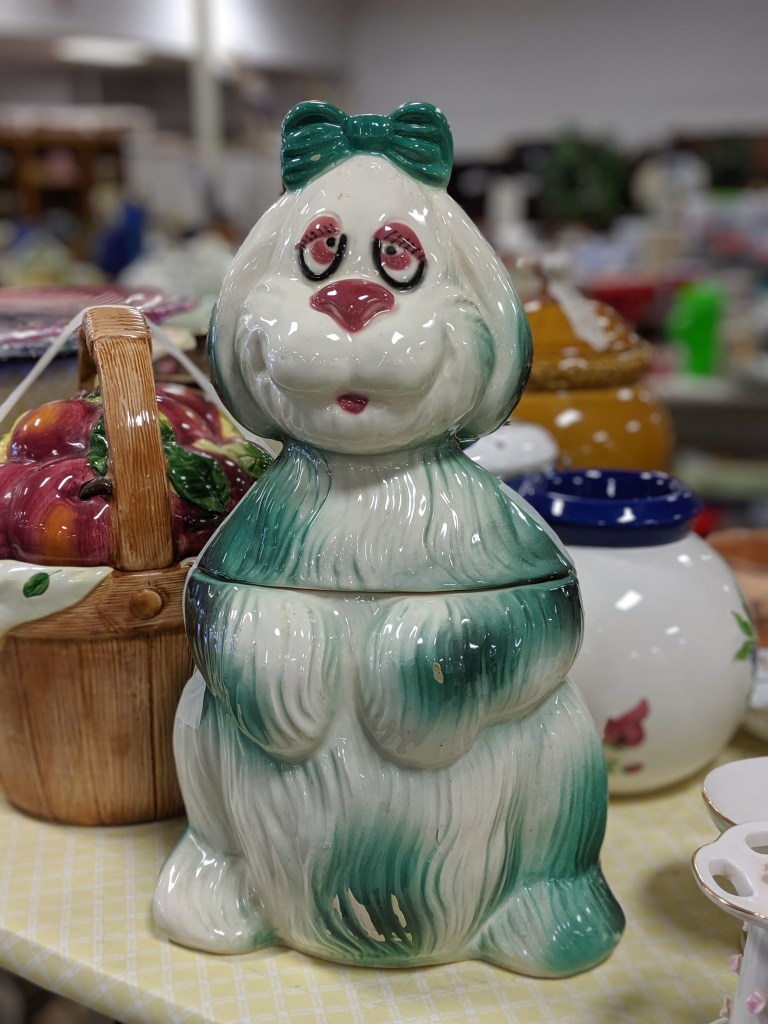
Just a quick post today to fulfill my daily goal. I saw this cookie jar (?) at a thrift store. I don’t know if this is some type of cartoon character, or what. Any ideas? Later this month I will be posting some other interesting thrift store finds!

Just a quick post today to fulfill my daily goal. I saw this cookie jar (?) at a thrift store. I don’t know if this is some type of cartoon character, or what. Any ideas? Later this month I will be posting some other interesting thrift store finds!
I had a class with Liberty Rose yesterday and we made this Santa Claus pillow. The face is embroidered with one strand of floss and a silver floss was used to get the twinkles in his eye. When the face and other parts were stitched down, a bit of stuffing was added to make him “pop” off the background. I added the “ho, ho, ho” on the side since he wasn’t quite centered by himself.

What Christmas projects are you trying to finish up before the holidays?
Keep it thimble!
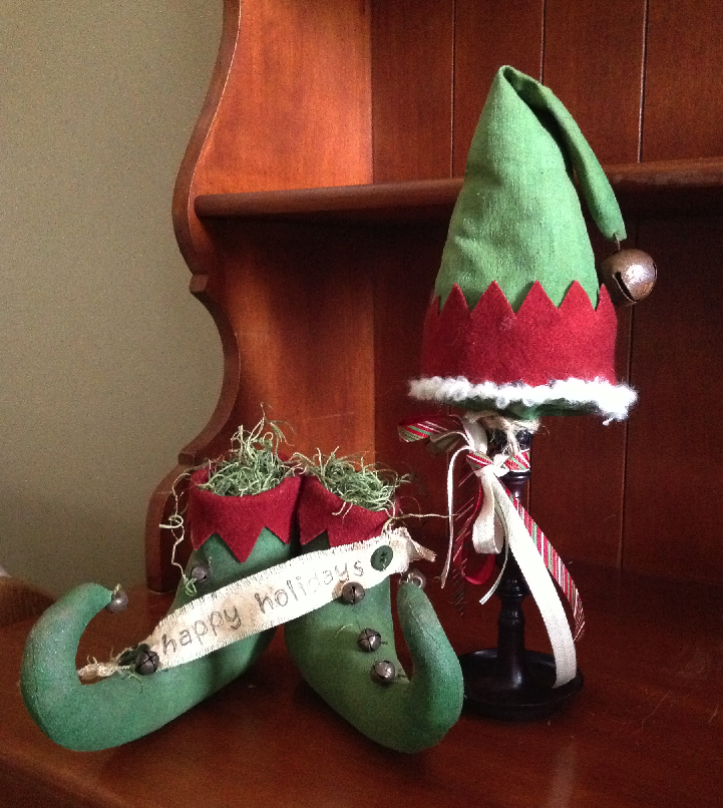
This is a cute little project of an Elf Hat and Shoes. The shoe pattern is from Country Whims and the Hat pattern is courtesy of a class with Liberty Rose. They turned out pretty cute and look great in the hallway, almost like the Elf stopped for a visit and took off his shoes and hat off at the front door.
Keep it Thimble!
Now that it’s finally December, I can start posting Christmas things! I had a crazy idea about posting something everyday in December as a sort of holiday countdown, but the reality of doing that is a different story.
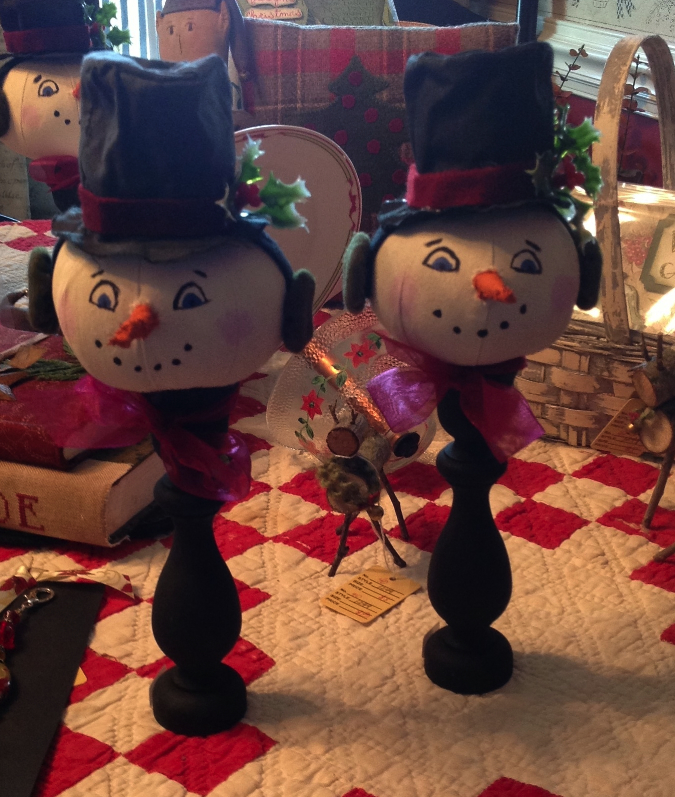
Last year I planned to make a bunch of these cute little Frosty make-dos; they were all cut out, the heads were sewn, the candlesticks were prepped, but I just didn’t manage to finish them. This year I completed 12 of them and they are being sold at a local shop. I think they turned out pretty cute!
My favorite part is the carrot nose that sticks out. Some of the carrots turned out a bit crooked, which give the face a lot of character. I made one snow woman because a customer requested both a man and woman. She has on ear muffs and a different face. Unfortunately, I didn’t get a picture of her before she went to her new home!
Keep it thimble!
I finally finished this project! It a very colorful wool table topper for my kitchen table. The pattern originally appeared in the Summer 2012 issue of Primitive Quilts and Projects, but it was a tote bag. Liberty Rose had a great idea to turn it into a table topper, which has a lot less stitching.

I love the bright colors and it will look perfect in the kitchen! My son really wanted me to add a pumpkin this, but I was able to talk him out of it. Since I already had the bright orange carrots, I thought a pumpkin might be a bit much. What do you think?
Keep it Thimble!
Dear Keep it Thimble,
I inherited an armful of fabric from a local quilter who passed away and it has been sitting on my shelf for a couple of years. She had a tendency toward traditional fabrics and patterns; I don’t share that. I don’t know what to do with this. Keep it until I find a use for it? give it away? I am afraid that the minute I give it away I will find a use for it. And I feel badly since this fabric was a gift from her husband, who wanted other quilters to have it.
But I have little storage space and this stuff is taking up badly needed space…I favor bright colors, batiks, polka dots, not flowers. Any suggestions?
Susan

Hi Susan,
Thanks for writing. If you haven’t found a use for it yet, and you know you don’t really care for it, it’s unlikely you will find something to do with it in the next few years. Since it sounds like you can use the space, you want to explore ways you can either give away the fabric with a clear conscience, or at least swap it out for fabric that is more to your liking.
One idea would be have a fabric swap where you invite some friends over to swap out pieces from your stash. This doesn’t solve the storage issue, but maybe it will make it easier to part with the fabric that you aren’t too crazy about and be assured that this fabric is going home with someone who wants it and has a plan for it.
Another idea is to use the fabric to sew up some quilt for charity. There are always organizations that can use these quilts and this might be a nice use for the fabric since you don’t plan to use it for personal projects. Here’s a link to a list of charities you can check out:
http://www.quiltersworld.com/makeadifference.php
You could also donate the fabric to a local quilt guild. They can use it to make quilts for charity and will make sure it gets put to good use. Another option, less altruistic, is to have a quilter’s yard sale to get rid of the fabric. I’ve done this twice in the past and have had great success. Depending on the quality and age of the fabric, you could get $2 – $5 yard, which can add up quickly.
Hope this helps. Keep it thimble!
Heather
One more day until the candy bonanza! My son already went trick or treating at two events this weekend, so we already have a good start. His plan for Wednesday is to stay out until he fills an entire grocery bag with candy.

In between all the Halloween stuff, I made this Halloween pillow from some scraps leftover from another project (to be posted in a few weeks). I used the scraps to make the patchwork squares, and then made them into a simple nine-patch block by using an orange fat quarter.

I was originally going to put pom-pom trim around the pillow, but I figured this was a good opportunity to teach myself how to a the ruffler foot. As you can see from the picture, ruffler foots are kind of scary (thus, perfect for Halloween) and intimidating. I didn’t even know how to attach it! Thanks to the internet, I was able to find a few videos that explained the process and I was on my way. Once the foot is attached, it really is quite easy to use. Soon I had 3 yards of ruffled material in no time flat.
I was going to stuff it with Fiberfill but then decided to splurge and get a pillow form instead. Using it makes a huge difference in the shape and finished look of the pillow. The back has an envelope opening so you can slip the pillow form in and out in case you need to wash it.
I see a pillow-making tutorial in the future….
Keep it Thimble!
Wow, the summer is almost gone and I still have so much I wanted to accomplish. However, I had a great summer so I’m not complaining. I promise to get back to more regular posts this fall. Everyone deserves a summer break, don’t they?
In order to get inspired for writing up some new patterns and tutorials, I decided I needed a little inspiration. The sewing room is looking a bit drab because I haven’t made the curtains yet (which will be in a very vintage and cheery looking Minnick and Simpson fabric). So I decided to create a sewing machine cozy!

The tutorial is from Strawberry Patches and I figured this would be the best way to bring in a dash of cheer and inspiration to the room. Once the cover was completed, it seemed like it was missing something, so I decided to applique my favorite sewing slogan on it – and voila! – a constant and fun reminder of how to approach life.
For the applique, I used Steam a Seam 2, which is double-sided fusible web. I cut out the letters, fused them on, and then did a basic zigzag stitch around the edges to hold them in place. I love how it turned out!
Keep it Thimble!
I’ve been working on a table topper from the Summer 2012 issue of Primitive Quilts and Projects that features both piecing and applique. The background pieces were cut out a few weeks ago and I spent the past week piecing them together. I felt really triumphant when I completed it on Saturday. The plans was to start work on the applique part on Sunday. However, after looking at it closely, I spotted a mistake….

I felt I could live with it, but after sleeping on it I decided I couldn’t! I spent a few hours Sunday fixing it, but it was worth it. Below is the corrected background. The applique work can wait until next weekend.

Just for fun, let’s turn this into a giveaway. The prize is a cute little cupcake pincushion (color may vary).

Post a comment below with what you think mistake is and how you would fix it. All comments will be included in the drawing (even the ones that don’t have the correct answer). Deadline for comments is Sunday, August 5th. Winner will be notified via email and announced on the blog.
Keep it Thimble!
Strawberries have a special place in my heart – not only are they delicious, but they also remind me of summers picking strawberries with my Grandpa. His sister lived on a farm, and every morning he would take my brother and me to the farm to pick a bushel of berries.

Most of them would be sold at the farm’s roadside stand (I believe we were paid .25 cents for each quart we picked), but he always brought at least one basket of fresh berries back home. My grandmother would spend the summer making homemade strawberry jam, strawberry pies, and of course strawberry shortcake. I never got tired of eating strawberries, but I sure did get sick of picking them!

In the spirit of family tradition, I introduced my son to the joy of picking strawberries. Of course, we only picked for about 20 minutes – not 2 hours :). He really enjoyed it, and was happy when I poured some of my berries in his bucket so he could have more than me (the things we do for our kids). We picked about 10 quarts and only paid 6 dollars, definitely a bargain.

And of course we had strawberry shortcake for dessert that night. In my opinion, you can’t beat the Bisquick shortcake recipe. I grew up on it and it still tastes the best to me! You have to use Original (full fat) Bisquick for the tastiest result, although I have made it with the reduced fat kind and it still tastes good. You also have to use REAL whipped cream. I like to add about 1/4 cup of powered sugar to my whipped cream to give it a hint of sweetness.
Classic Strawberry Shortcake
(original recipe from Betty Crocker website)
1. Heat oven to 425°F. In large bowl, mix strawberries and 1/4 cup sugar; set aside.
2. In medium bowl, stir Bisquick mix, milk, 3 tablespoons sugar and the butter until soft dough forms. On ungreased cookie sheet, drop dough by 6 spoonfuls.
3. Bake 10 to 12 minutes or until golden brown. Meanwhile, in small bowl, beat whipping cream with electric mixer on high speed until soft peaks form.
4. Split warm shortcakes; fill and top with strawberries and whipped cream.
What are some summer desserts you like to eat?
Keep it Thimble!
