My son is crazy about mushrooms. Last year for Christmas he wanted a book titled Mushrooms of West Virginia and the Central Appalachians (of course he got it!). He came up with this fun little mushroom craft that requires very few supplies.
Supplies Needed:
1″ Wooden spools or knobs (one for each mushroom)
Fabric scraps to make 2 1/2″ circles
Thread
Glue
Markers
He rooted through my scrap basket and selected about 11 different fabrics that looked like mushroom tops. Batiks work well for this, as do tone on tone prints. He also found that the reverse side of the fabric would sometimes work.
Next, cut out a 2 1/2″ circle from each fabric scrap. Using a needle and thread, sew a running stitch about 1/3″ in from the edge. Gather the circle and add a small bit of stuffing. When making the first one (pictured above) we placed the wooden spool instead the gathered circle and pulled the thread tight, and tied it off. This was pretty awkward and too some time to get the thread tight enough. For the other ones, we gathered up the circle, stuffed it, tied it off, and then glued the “puff” on top of the wooden spool. That worked much better and was even cuter!
Once the mushroom is dry, use a green marker to draw a bit of grass at the bottom. If you like, add a smiley face!
I cut out a piece of green felt for the meadow and gave him a plastic Crystal Light container for storage. Viola! A portable mushroom meadow!
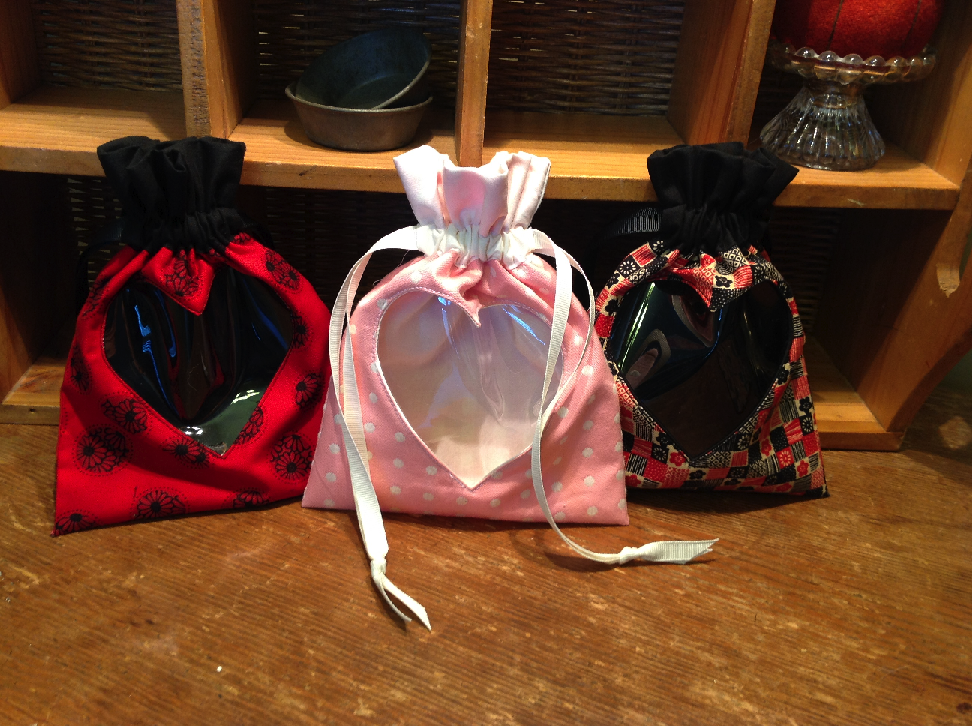
I found the tutorial for these drawstring pouches at Twinkle and Twine. They are so cute and very easy to make. I made six in one afternoon, I could have made more, but ran out of vinyl for the windows. The tutorial has great directions, even for beginners.
I plan to make these with other cut-out shapes for different occasions – a baby rattle, christmas tree, cupcake, and so on. I’m even going to make one with a thimble, of course!
Wow, the summer is almost gone and I still have so much I wanted to accomplish. However, I had a great summer so I’m not complaining. I promise to get back to more regular posts this fall. Everyone deserves a summer break, don’t they?
In order to get inspired for writing up some new patterns and tutorials, I decided I needed a little inspiration. The sewing room is looking a bit drab because I haven’t made the curtains yet (which will be in a very vintage and cheery looking Minnick and Simpson fabric). So I decided to create a sewing machine cozy!
Sewing Machine Cozy
The tutorial is from Strawberry Patches and I figured this would be the best way to bring in a dash of cheer and inspiration to the room. Once the cover was completed, it seemed like it was missing something, so I decided to applique my favorite sewing slogan on it – and voila! – a constant and fun reminder of how to approach life.
For the applique, I used Steam a Seam 2, which is double-sided fusible web. I cut out the letters, fused them on, and then did a basic zigzag stitch around the edges to hold them in place. I love how it turned out!
School will be out in 15 days (!), and it’s time to think about end of the year teacher gifts. Teachers always appreciate a gift card, but it’s also nice to make them a little something just so the gift is more personal. I was trying to think of something fun and easy, since my son has lots of teachers, and then I remembered the good old travel tissue holder! You can tuck the gift card in the opening, tie a pretty bow around it, and it is the perfect teacher gift.
Tissue Covers
There are a lot of tutorials online on how to make these, so I figured it would be fun to share some of them with you and show you my finished results. For mine, I used a tutorial posted at Melinda’s Quilts, ETC (http://melinful.blogspot.com/2010/01/travel-tissue-cover-tutorial.html). The reason I liked this one is because it just uses two pieces of fabric (exterior and lining) and is sewn in a way that makes its own trim on the edges of the opening. It literally took me 10 minutes to cut out the fabric and sew it together.
Press Seam Open
After sewing the tube, I used my point presser and centered the seam on the top part so that the seam could be pressed open (see above).
Pinked Raw Edges
In addition, the raw edges were cut with pinking shears to prevent them from raveling. This gives nice finished edge and you don’t have to mess with bias tape.
Back of Tissue Holder – Fussy Cut
Lastly, on one of the covers I fussy cut the fabric so that the floral motif was centered on the back of the tissue holder. Also, these are great stashbusters – you only need 2 scraps of fabric less than 8″ square for each one (and a packet of travel tissues from Target).
Here are some links to some other tutorials:
Sew Much 2 Luv has a fun tutorial that uses 4 scraps of fabrics.
The Distracted Domestic has a tutorial that is a variant on the method Sew Much 2 Luv uses – but it uses just one strip of fabric.
Whimwham at Craftstylish posted a tutorial that shows you how to add some fancy machine embroidery on the front. This is a great way to personalize the gift.
Craftapalooza at Whipup discusses her LAB technique for making these. She uses trim around the opening for a nice contrast.
What are your ideas for teacher gifts? I’m always on the hunt for more fun and easy projects.
Last week, my husband discovered a nest of baby rabbits in our back yard! They grow pretty quickly and recently were big enough to leave the nest. It was hard to get a good picture of them since we didn’t want to disturb them. The mama rabbit would come by in the evenings to check on and feed her two little bunnies. They are so cute and we were sad to see them go, but maybe they will come back to say “hello” on Easter.
Baby Rabbits!
Speaking of Easter, you probably have everything you need for your baskets, but if you are looking for a fun and quick project, click HERE for my tutorial on how to make a Sock Bunny! I made these last year was very pleased with the results. If you have time, you can also make a colorful vest, dress, or bonnet for your rabbit.
Happy Birthday to me! Yes, today is my birthday – one of my favorite days of the year (besides Halloween and Fourth of July) and I thought it would be fun to celebrate with a Cupcake Pincushion.
Birthday Cupcake Pincushion
Awhile back during one of my thrift store runs, I bought a bunch of plastic ramekins with the idea of making something with them. Inspiration struck me when I was trying to come up a fun gift for a sewing friend and this cute little cupcake pincushion was born. In honor of my birthday, I put together this tutorial for you.
Supplies Needed:
3 oz plastic fluted ramekin
Poly-fil stuffing
6″ Sq. Fabric
Size 5 Perle Cotton
Red Button
Ribbon
Saucer (for template)
Glue (I used Allene’s Quick Dry glue)
Long needle
3/16″ glue dots
1. Trace around the saucer on the square of fabric. The circle should be roughly 5 1/2″ in diameter.
2. Thread an embroidery needle with a 36″ piece of perle cotton. Make a running stitch around the outside of the circle with about a 1/4″ seam allowance. (Figure 1)
Figure 1 - Running Stitch
3. Gather the circle and stuff tightly with Poly-fil. Gather tightly and tie off, but leave about 28″ of thread for the long tail – do not cut. (Figure 2)
Figure 2 - Stuff
4. Poke the needle through the top center of the pincushion and come out at the bottom center. Wrap perle cotton around edge of pincushion and come down through the top center again. Pull on thread to make tight (cushion will dimple on the side). Wrap cotton on the opposite side and come down through top center again and pull tight. Proceed in this manner until you have done this a total of 8 times. The cushion will now be segmented into 8 parts. (Figure 3)
Figure 3 - Segment Cushion
5. Bring thread up through center one more time so that it is coming out through the top center. Take red button and place in top center of pincushion. Thread the perle cotton through button holes and then down through bottom to secure button. Repeat 2 – 3 times. (Figure 4)
Figure 4 - Sew button
6. Apply glue to inside of ramekin. (Figure 5). Place cushion inside ramekin and let dry for a few hours.
Figure 5 - Glue in ramekin
7. Cut 18″ of ribbon. Use glue dots to secure ribbon to outside of ramekin (place glue dots about every inch around top). Tie into a bow. Put a dot of glue to secure bow. Add some pins. Enjoy! (Figure 6).
Sewing gadgets can make life easier, and if they are the right price, I am happy to try them out. Some of these things include a bobbin winder (used twice), a 1/4″ rule for marking seams (used a lot!), and the Dritz EZ Hem (used once for this dress). As you can see, even when you have the right tool for the job, you may not find that it is a must-have (just a fun to have). However, there are 5 sewing tools I can’t live without.
1. Seam Ripper
Clover Seam Ripper
This gets used all the time! I used to get frustrated whenever I had to rip out a seam, but now I find it kind of therapeutic. Seam ripping is a nice break during a marathon sewing session. Also, once I learned the correct way to rip out a seam, the job was much faster and easier. There are two seam rippers I recommend (having used both quite a bit): the ergonomic once by Clover and the Dritz one that folds (which is nice for travel). The main thing is to pick a seam ripper you can easily hold in your hand without it cramping up.
2. Iron
Rowenta Steam Iron
An iron is on this list, even though it is probably not considered a sewing notion, but it is a necessity. There are wide variety of opinions on which one is best. Many people swear by their $20 iron, while others say that the more expensive irons are worth the money. I’ve had experience with both types and I find the more expensive irons (like a Rowenta) really do work better for quilting and sewing. This is because of several reasons — and if you can find a cheaper iron that has the following features, get it:
The first thing to consider is the weight of the iron, a big heavy iron is going to work better since the natural weight of the iron makes it easier for you to press down and get a nice flat seam. Some people find that an iron can be too heavy and thus tire out their arms, so keep this in mind. The temperature is another factor in how well your iron works – you want a iron that can get nice and hot, especially when working with cotton – the hotter the iron, the flatter the seam. The final thing to consider is steam – more expensive irons have more holes for the steam to escape, which makes better use of the steam. One caveat is that if you store your iron with water inside, it is more likely to leak. I have heard that keeping water in the iron is the biggest reason why irons start leaking and break down. Each time I finish with my iron, I empty out the water, and I also run the self cleaning function a few times a month.
3. Scissors
Gingher 8" Dressmakers Shears
Again, this is an area where you can spend a little or lot of money. After comparing scissors, I splurged and bought Ginghers (made in the USA!) –8″ dressmakers shears for cutting fabric, 7″ craft scissors for ribbon, wool, and foundation piecing, and a 4″ utility pair for embroidery and applique (also good for travel). There are several reasons that Ginghers are worth the money. First, they accurately cut all the way to the very tip of the blade. This is especially important for detail cutting, where you don’t want to risk a slip of the scissors. They are really sharp and can through cut several layers of fabric at once. They are LIFETIME scissors, meaning they will never wear out and I can send them to Gingher at anytime to get them sharpened (for a nominal fee) and they will be like new again.
One interesting thing to note is the difference between scissors and shears. The word “scissors” is used interchangeably between the two, but there is a difference Scissors are usually smaller, and feature two similar sized round holes for your fingers. The handles are separate and made of plastic while the blade part is metal.
Shears feature a round hole for the thumb and a larger oval hole for the rest of your fingers. This makes the shears easier to control when you are cutting fabric. The handle and blade are made out of one piece of metal. , which means that shears are two metal “scissors” held together by a bolt.
4. Chalk Wheel Marker
Clover Chalk Wheel Marker
Oftentimes while sewing, there is a need to mark the fabric. For example, you may need to draw lines for quilting, divided pockets, o r a hemline. The chalk wheel marker makes a nice sharp line and wipes off very easily. For a few dollars you can purchase a bag of chalk dust for refills and it last a loooong time.
5. Pincushion
Tomato Pin Cushion
Pincushions are something I can’t live without. They are pretty, functional, and fun to make. I have three that get used on a regular basis, and several others for decorative purposes. They are great scrap busters and you can make them in variety of shapes and sizes.
From a functional standpoint, pincushions are much easier to use — you don’t have to worry your pins falling on the ground as you add and remove pins to your project. If you want to get fancy with your pins and needles organization you can section off the pincushion by type – needles in one section, applique pins in another, and quilting pins in a third.
Finally, the tomato pincushion is pretty much the universal sewing symbol. Why the tomato you ask? According to some, people used to place a ripe tomato on the mantle of a new home to guarantee future prosperity. However, in those days, tomatoes were not available year-round (or would rot easily), so a round ball stuffed with sawdust or sand was used instead. These balls were the perfect place for storing pins, thus the tomato pincushion was born. The strawberry that is attached to most pincushions is filled with emery which is useful for sharpening pins. I wasn’t able to find an explanation for how the strawberry got added to the pincushion…if anyone knows, please enlighten us!
Shaker Pincushion
Since everyone needs a pincushion and a place to store all their odds and ends – a Shaker Pincushion is the perfect solution. Click here for my free pattern. Enjoy!
Looking for a quick gift or a fun home dec idea? Here’s a set of Pretty Patchwork Heart Pockets that can be sewn together in about an hour. This tutorial includes directions for making both versions!
Pretty Patchwork Heart Pockets
Make a bunch of these and place in a pretty basket or bowl. Use clothespins to attach them to ribbon and create a fun garland or window swag!
Pretty Patchwork Heart Pocket - Version 1
You can use scraps for this and make them in a variety of colors – red and white for Valentine’s Day, green and white for St. Patrick’s Day, red/white/blue for Fourth of July, orange and black for Halloween, or red and green for Christmas!
Pretty Patchwork Heart Pocket - Version 2
The back features a small pocket. Tuck in a gift card or some dried flowers.
Pretty Patchwork Heart Pocket - Back View
From Fabric A cut:
Three 4.5″ squares
One 5.5″ Square
One 3.5″ x 2.5″ rectangle
From Fabric B cut:
Three 4.5″ squares
One 5.5″ Square
One 3.5″ x 2.5″ rectangle
Take one Fabric A 4.5″ square and one Fabric B 4.5″ square. Pin the squares right sides together and sew a 1/4″ seam on the right and left sides. Make two sets (Figure 1).
Figure 1 - Sew Side Seams
Cut these units into three rectangles that are 1.5″ x 4.5″. Make sure you are cutting parallel to the seams you just made (Figure 2). Do this for both sets.
Figure 2 - Cut Into Strips
Press the seams towards the darkest fabric to create two pieced units (Figure 3).
Figure 3 - Press open
Take the center rectangles and sew them to the appropriate side of the pieced units (Figure 4). Press the seams to the darks. You now have two units of alternating fabrics (A-B-A and B-A-B). Make two sets.
Figure 4 - Sew Strips to Create Squares
Take one of each type of square (A-B-A and B-A-B), make sure stripes are going the same direction, and pin them right sides together. Sew along the shorter sides with a 1/4″ seam. Do this for both sets. Cut each set into three rectangles that are 1.5″ x 4.5″. You will be cutting perpendicularly to the stripes (Figure 5). Press the seams.
Figure 5 - Sew Side Seams and Cut Into Strips
Sew the center strip to the appropriate pieced unit to make TWO nine-patch blocks (Figure 6). Do not sew the other strips to make blocks. You will now two nine-patch blocks and two sets of partial blocks.
Figure 6 - Sew Two Nine Patch Blocks
To make Version 1, sew the partial blocks onto one nine patch block (Figure 7).
Figure 7 - Create Version 1 Heart
Take make Version 2, sew the 3.5″ x 2.5″ rectangles onto one nine patch block (Figure 8).
Figure 8 - Create Heart Version 2
Set these two heart fronts aside and make the pocket. Take the remaining two of the 4.5″ squares, and press it on the diagonal right sides OUT (Figure 9).
Figure 9 - Make Pocket
Take one of the 5.5″ squares, place it right side up, and then pin one of the folded triangles on this to make the pocket. For best results, use contrasting pocket on the backing fabric (Figure 10).
Figure 10 - Pin Backing to Pocket
Pin one heart front and one heart back right sides together (Figure 11).
Figure 11 - Pin Backing and Heart Right Sides Together
Download Heart Template here. Trace onto piece of cardboard and cut out template. In order to create sewing line, place template on pinned hearts and trace around it (Figure 12). DO NOT CUT. Sew around the line you just drew – leave a 3″ opening in one side for stuffing.
Figure 12 - Trace Around Heart Template
Cut off excess fabric and leave about 1/4″ seam. Clip corner, curves, and heart center. Turn inside out (Figure 13). Stuff lightly and hand-stitch opening closed.
My son wants to be a mad scientist when he grows up (see Exhibit A):
Mad Scientist
Today, he took a big step towards this lofty goal – starting Kindergarten! He wanted to bring an apple to his new teacher (where do kids get these ideas – TV?), so I figured a stuffed one is the way to go.
Basically (for sewing purposes), an apple looks like a tomato expect that it is taller. I made up a template that looked like an oval that came to a point at each end. The size was about 2″ x 5″. I cut out five (5) of these ovals from quilter’s cotton (although you could also use wool), sewed them together, and left one side open for turning.
Stuffed Apple for Teacher
Turn the piece inside out, stuff, and then hand sew opening closed. Get a small button for the bottom of the apple. Next, take an upholstery needle and thread with strong twine (I used linen thread). Poke the needle down into the center of top and come out through one of the button holes on the bottom. Poke the needle back into another button hole, come out through the top, and then pull tight. Do this 2 more time so that you can create a nice dimple in the top and bottom of the apple. Don’t cut the thread.
Next, cut out two leaves from felt and sew to the top of the apple. You can use the same thread you used for making the dimples. Tie off thread and cut off excess. Get a black pipe cleaner and cut it about 3″ long. Near the base of the leaves, poke a very small hole with scissors and insert the stem. You can use a dab of glue to hold into place. Voila – an apple for the teacher that will never spoil.
My son enjoys all kinds of creatures, both big and small. A few weeks ago he asked me if we could make a stuffed paramecium. He learned about these one-celled organisms from watching the “Cat in the Hat” (proof that television IS educational 🙂 ). For those of you who need a refresher in biology, here is a picture of what one of these critters looks like:
Diagram of Paramecium
As you can see, it is a simple oval, with some colored shapes inside the body, and a row of little hairs around the edge – simple enough to make with some fleece, felt, and pom-pom trim! This is a great project for you to do with your children since there are so many things they can do in the process. I didn’t take photos of the actual project in process, but the tutorial is fairly straightforward (I hope!).
Perry the Paramecium - Standing
To make one Paramecium toy you need:
1/2 yard fleece
Craft felt in assorted colors
3 yards pom-pom trim
1 bag Fiberfill
Google Eyes / Buttons (optional)
1. Starting by drawing 10 – 12 different shapes on the felt. Use a variety of colors and shapes to add interest. The shapes should be various sizes ranging from 2 x 3″ to 6″ x 6″.
2. Cut out the shapes and set aside. I found the shapes to be the most fun for my son. He drew and cut out all the shapes by himself. The bonus was that this kept him busy for about 2 hours (off and on) which gave me time to sew some other project.
3. Take 1/2 yard of fleece and cut it into two equal-sized rectangles (it’s easiest just to cut where the fabric was folded on the bolt). These will be the front and back of the paramecium.
4. Take one fleece rectangle and arrange the felt shapes on it. Again, my son did this step. He took each piece and placed it where he wanted on the creature. Be sure to leave about 1 – 2 inches seam allowance around the perimeter. Pin the shapes to the fleece.
Paramecium - Ready to Sew the Shapes
5. Using your machine, stitch the shapes onto the fleece. Stitch on top of the shapes (basically like raw-edge applique). Since this was a toy, I just stitched around the inside edge of each shape, leaving the edges of each shape raw. Don’t be a perfectionist about this, just get them stitched down securely. For example, I stitched through the center of each star point instead of trying to stitch around the perimeter of the star.
6. Take the pom-pom trim and loosely arrange in the shape of an oval around the perimeter of the fleece rectangle (the one with the shapes). You will have excess fabric at the corners. Caution – do not actually cut the fleece into the shape of an oval, this makes it harder to stitch together later on. Instead, just shape the trim into an oval shape and pin around the edges. Make sure the pom-pons are pointing towards the center of the fleece.
7. From the front, stitch around the pom-pom trim with your machine. You can use a basting stitch to complete this step more quickly.
8. Take the second piece of unembellished fleece and place it RIGHT SIDES TOGETHER with the piece you just finished embellishing. Pin around the edges.
9. Turn the piece over (pins and all) so you are now looking at the wrong side of the piece with all the felt shapes stitched onto it. With pins, clearly indicate where you will start and stop the seam in order to have a 6 inch opening for turning and stuffing (pick the center of one of the long sides).
10. You should be able to clearly see the stitching line around the perimeter that is securing the pom-poms. Using this seam as a guide, stitch the front and back together just inside this seam (about 1/8″ seam allowance). Again, no need to be a perfectionist about this. Remember to leave 6″ open for turning and stuffing.
11. Trim corners so that you now have a nice oval shape. Turn the paramecium inside out.
12. Stuff with fiberfill. This will use an entire bag of fiberfill! Again, kids can participate in this step and handle the stuffing themselves.
13. Once stuffed, whipstitch the opening closed by hand.
14. Optional: Glue on google eyes or sew on button eyes. My son opted to draw some eyes and mouth in the middle with a marker (can you see it in the picture?). However, he did mention he would like to sew on some buttons for eyes so you can see them better.
15. Name your new creature! My son called his “Perry.”