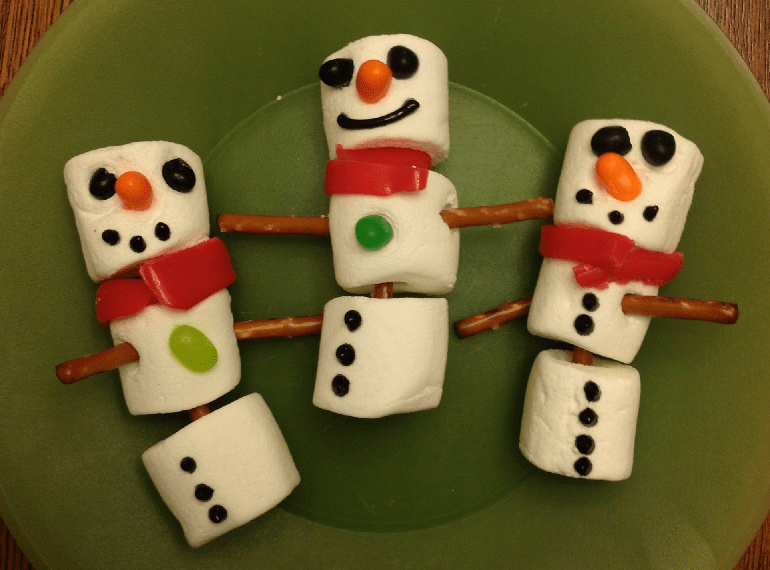
My husband and I went to a concert last night so a friend came over to babysit. He gets the prize for best babysitter, because he came prepared to do a fun food project! He had a bag of marshmallows, a tube of black icing, Jelly Bellys, Airheads, and pretzel sticks Add in one excited 6 year old and you get these adorable snowmen!
Marshmallow Snowmen
The pretzels are used to hold the marshmallows together and also for the arms. A Jelly Belly is used for the nose, and you can cut them in half to make eyes or buttons. A strip of airhead makes a delicious scarf. The final touch is putting on buttons with just a drop of black icing. I can’t wait to make these myself. Thanks for the idea Jim.
While sorting through some old fabric, this stash of Amy Butler fabric caught my eye. These pieces were set aside for another project, but I realized that they were better suited for the Bella Bag pattern from Indygo Junction. I’ve had the pattern for awhile, but never felt motivated to make it until I saw this fabric.
Bella Bag, pattern by Indygo Junction
The bag is very roomy and could easily be described as a tote bag – good for taking to the beach, library, or supermarket. The pattern is very well written and the instructions are easy to understand, but I think this is more suited for an intermediate sewer (or a confident beginner who likes a challenge). The difficulty comes when you are trying to sew the circular bottom piece onto the body of the bag.
The bottom of the bag is gathered and you have to space the gathering correctly so that the circle fits on the bottom (ie, not to large and not to small). For some reason, this was difficult, and the bottom seam is very puffy. This will probably flatten out over time or perhaps after I wash it.
Bella Bag, snapped together
The other challenge was creating the handles. You sew a tube of fabric, turn it inside out, and then insert upholstery cording. The cording has a tendency to become less compact as you pull it through the tube, so it took me a good 30 minutes to complete this step. I finally put a thick piece of scotch tape on the end of the cord to keep it from unraveling and so that it gave less resistance as it was pulled through the tube. The handles are what make the bag come together for me, I was bound and determined to get the cording in there!
The way the bag fastens is another nice feature. Magnetic snaps are on each side of the bag, so you can snap the sides together and then snap the front and back together. This is useful when you want the bag to look smaller or don’t have as much stuff in there.
Bella Bag, Interior
The buttons are from a place called Dill Buttons, and they have a wide range of fashion buttons that work great for purses and other accessories. I originally had some smaller ivory buttons on this, but they looked out of place and too small. The larger buttons look better, and the unusual shape is a nice contrast with the other patterns. I also added some top stitching on the bag body around the center seams. Top stitching always make a bag look more finished (I think).
What are some tips you have for making bags and other accessories? Any patterns you would recommend?