I love the books by Aranzi Aranzo. Fittingly, their books are called “The Cute Book,” “The Cuter Book,” “Cute Stuff” and so on. This is one of their patterns from “Cute Dolls.”
Pretty easy to make and only about 3″ high. I made this from craft felt and it took about 30 minutes from start to finish. The pieces are a bit small, so I enlarged the pattern by 15% to make it easier.
These would make really cute ornaments or package decoration! You could also glue a pin on the back so it could be a cute fashion accessory!
My son is crazy about mushrooms. Last year for Christmas he wanted a book titled Mushrooms of West Virginia and the Central Appalachians (of course he got it!). He came up with this fun little mushroom craft that requires very few supplies.
Supplies Needed:
1″ Wooden spools or knobs (one for each mushroom)
Fabric scraps to make 2 1/2″ circles
Thread
Glue
Markers
He rooted through my scrap basket and selected about 11 different fabrics that looked like mushroom tops. Batiks work well for this, as do tone on tone prints. He also found that the reverse side of the fabric would sometimes work.
Next, cut out a 2 1/2″ circle from each fabric scrap. Using a needle and thread, sew a running stitch about 1/3″ in from the edge. Gather the circle and add a small bit of stuffing. When making the first one (pictured above) we placed the wooden spool instead the gathered circle and pulled the thread tight, and tied it off. This was pretty awkward and too some time to get the thread tight enough. For the other ones, we gathered up the circle, stuffed it, tied it off, and then glued the “puff” on top of the wooden spool. That worked much better and was even cuter!
Once the mushroom is dry, use a green marker to draw a bit of grass at the bottom. If you like, add a smiley face!
I cut out a piece of green felt for the meadow and gave him a plastic Crystal Light container for storage. Viola! A portable mushroom meadow!
Some of you may recall that my son and I worked together on Perry the Paramecium over two years ago! This was a fun project that basically involved him telling me what he wanted and me making it. Now that he is older, he is a lot more involved in the collaborative process.
Last week I gave him a pile of fabric and told him to think about what he wanted to make with it. The next day he showed me the pattern he created for a a stuffed germ that he dubbed “Blanketitis” (since it was made with blanket material, get it?).
Pattern for Stuffed Germ
This was another fun and easy softie to make. I did the sewing, he did the stuffing and made all the creative decisions. He wants to make a whole line of stuffed germs, so we’ll have to see what he comes up with next!
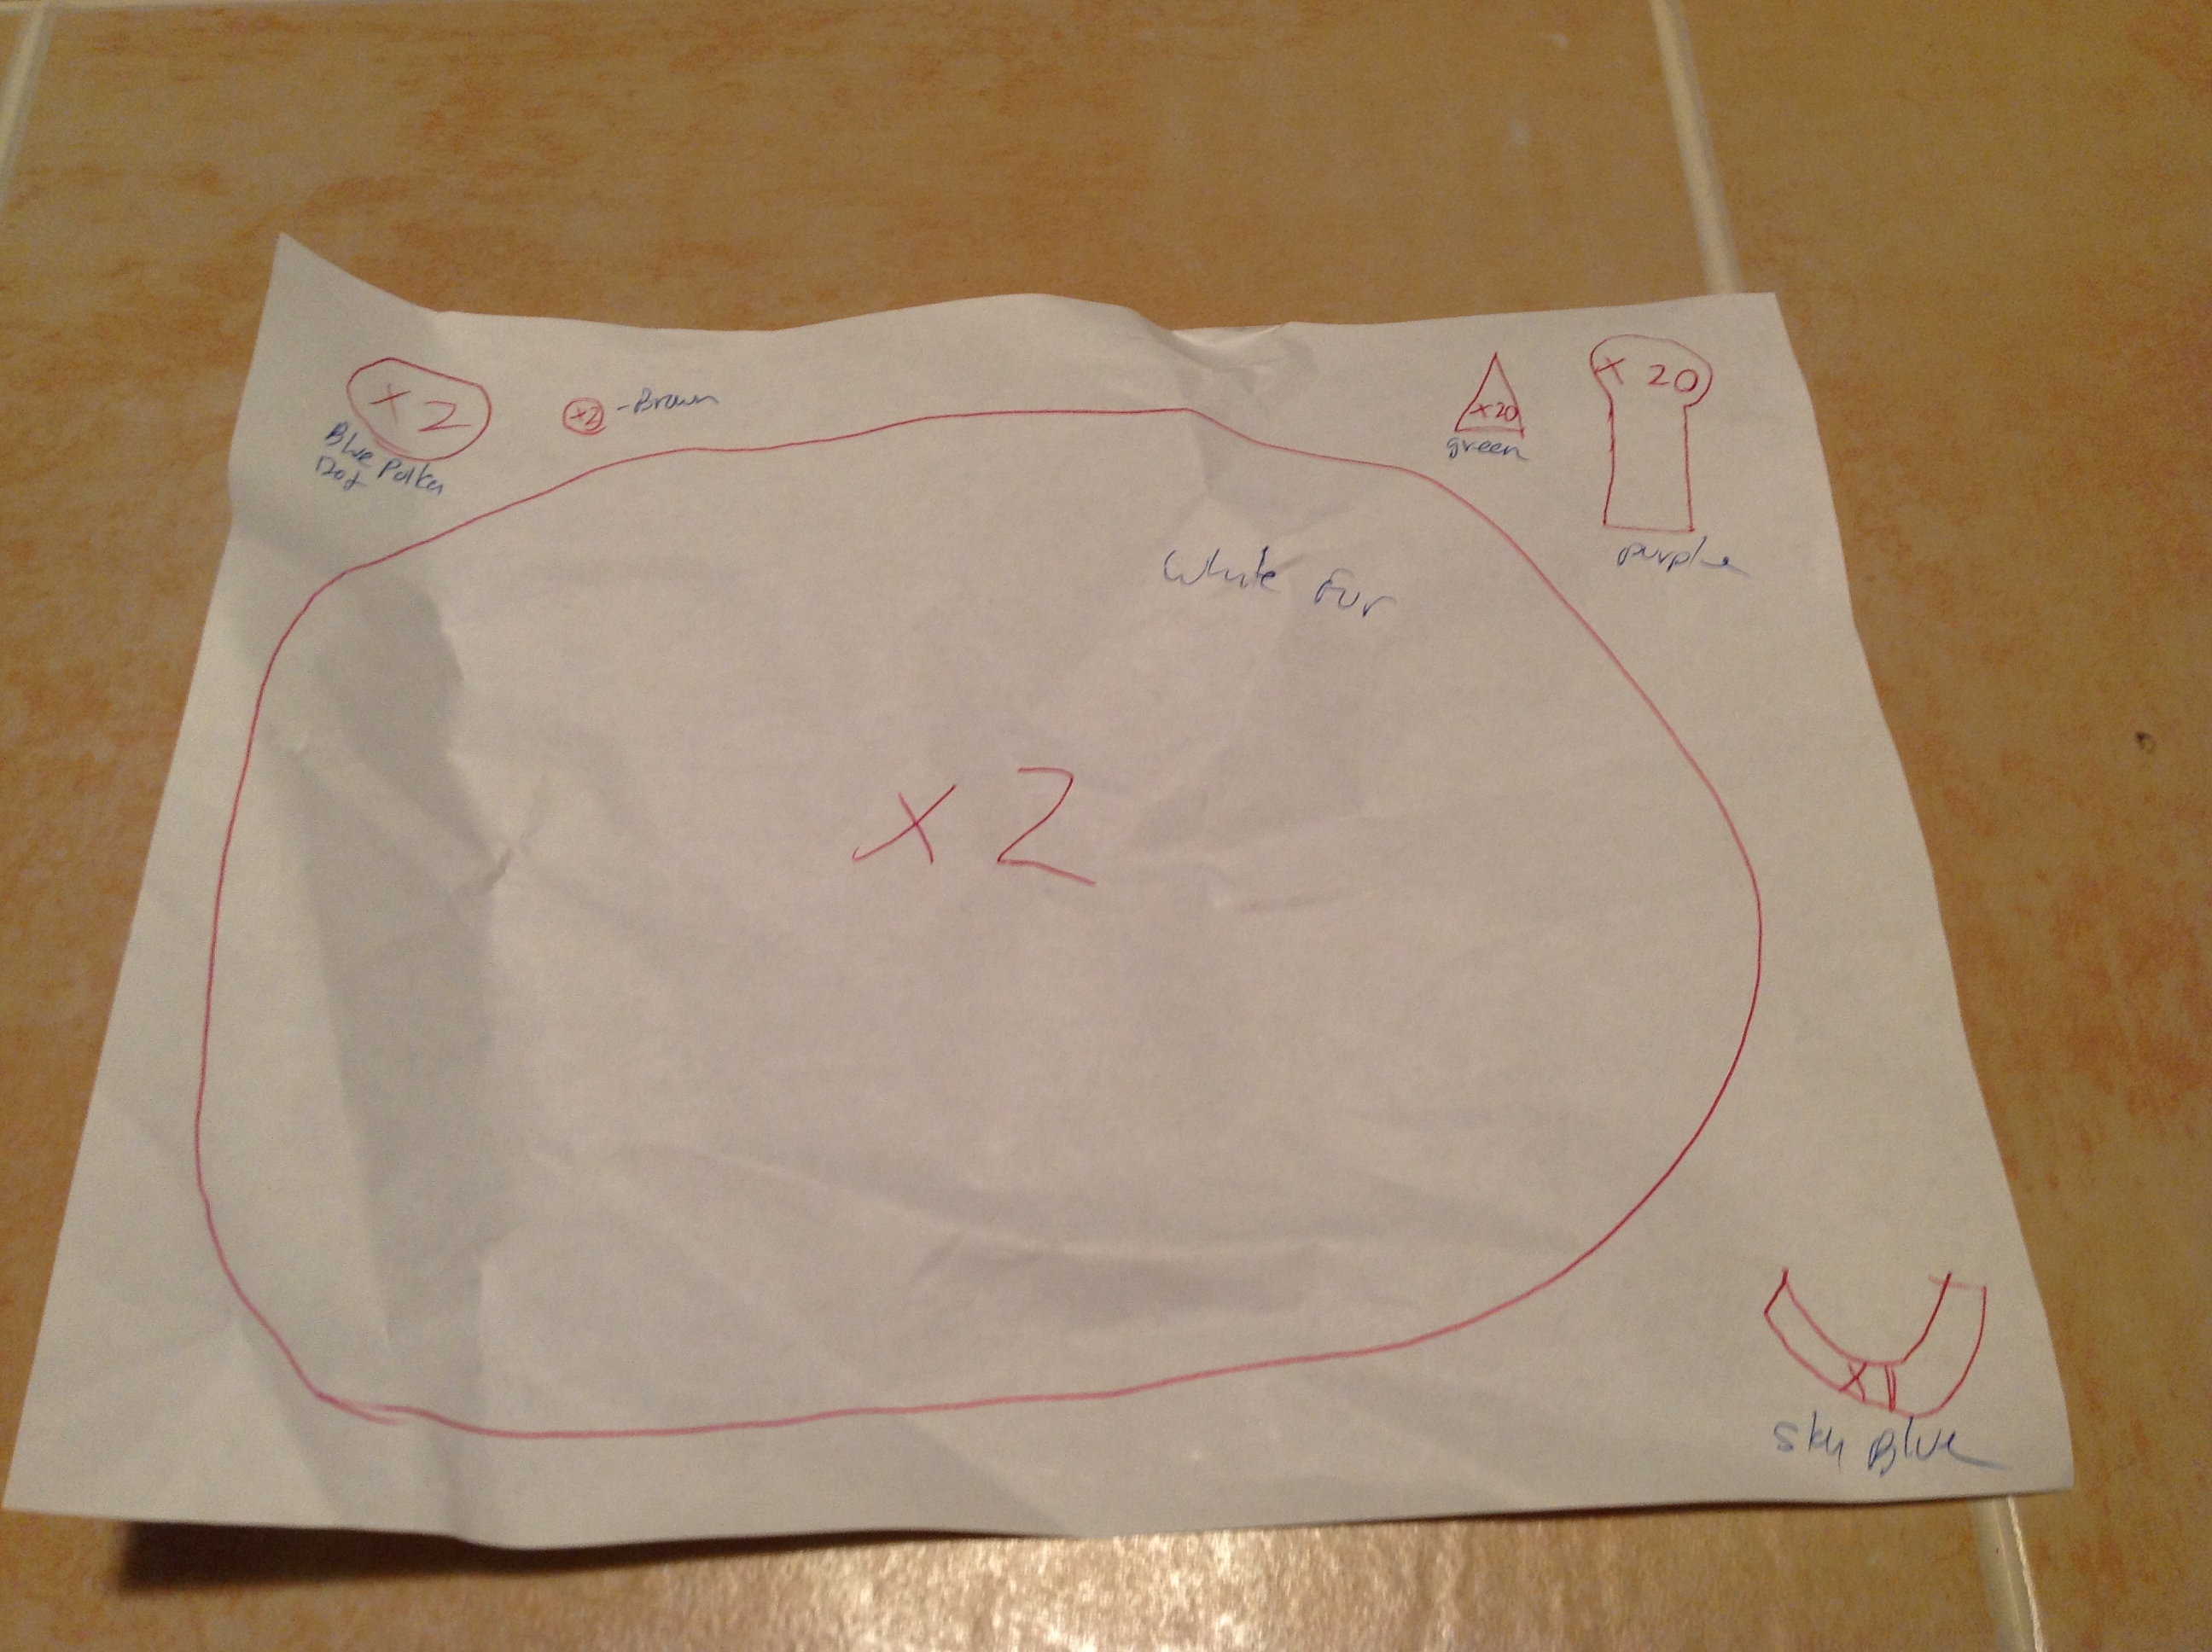
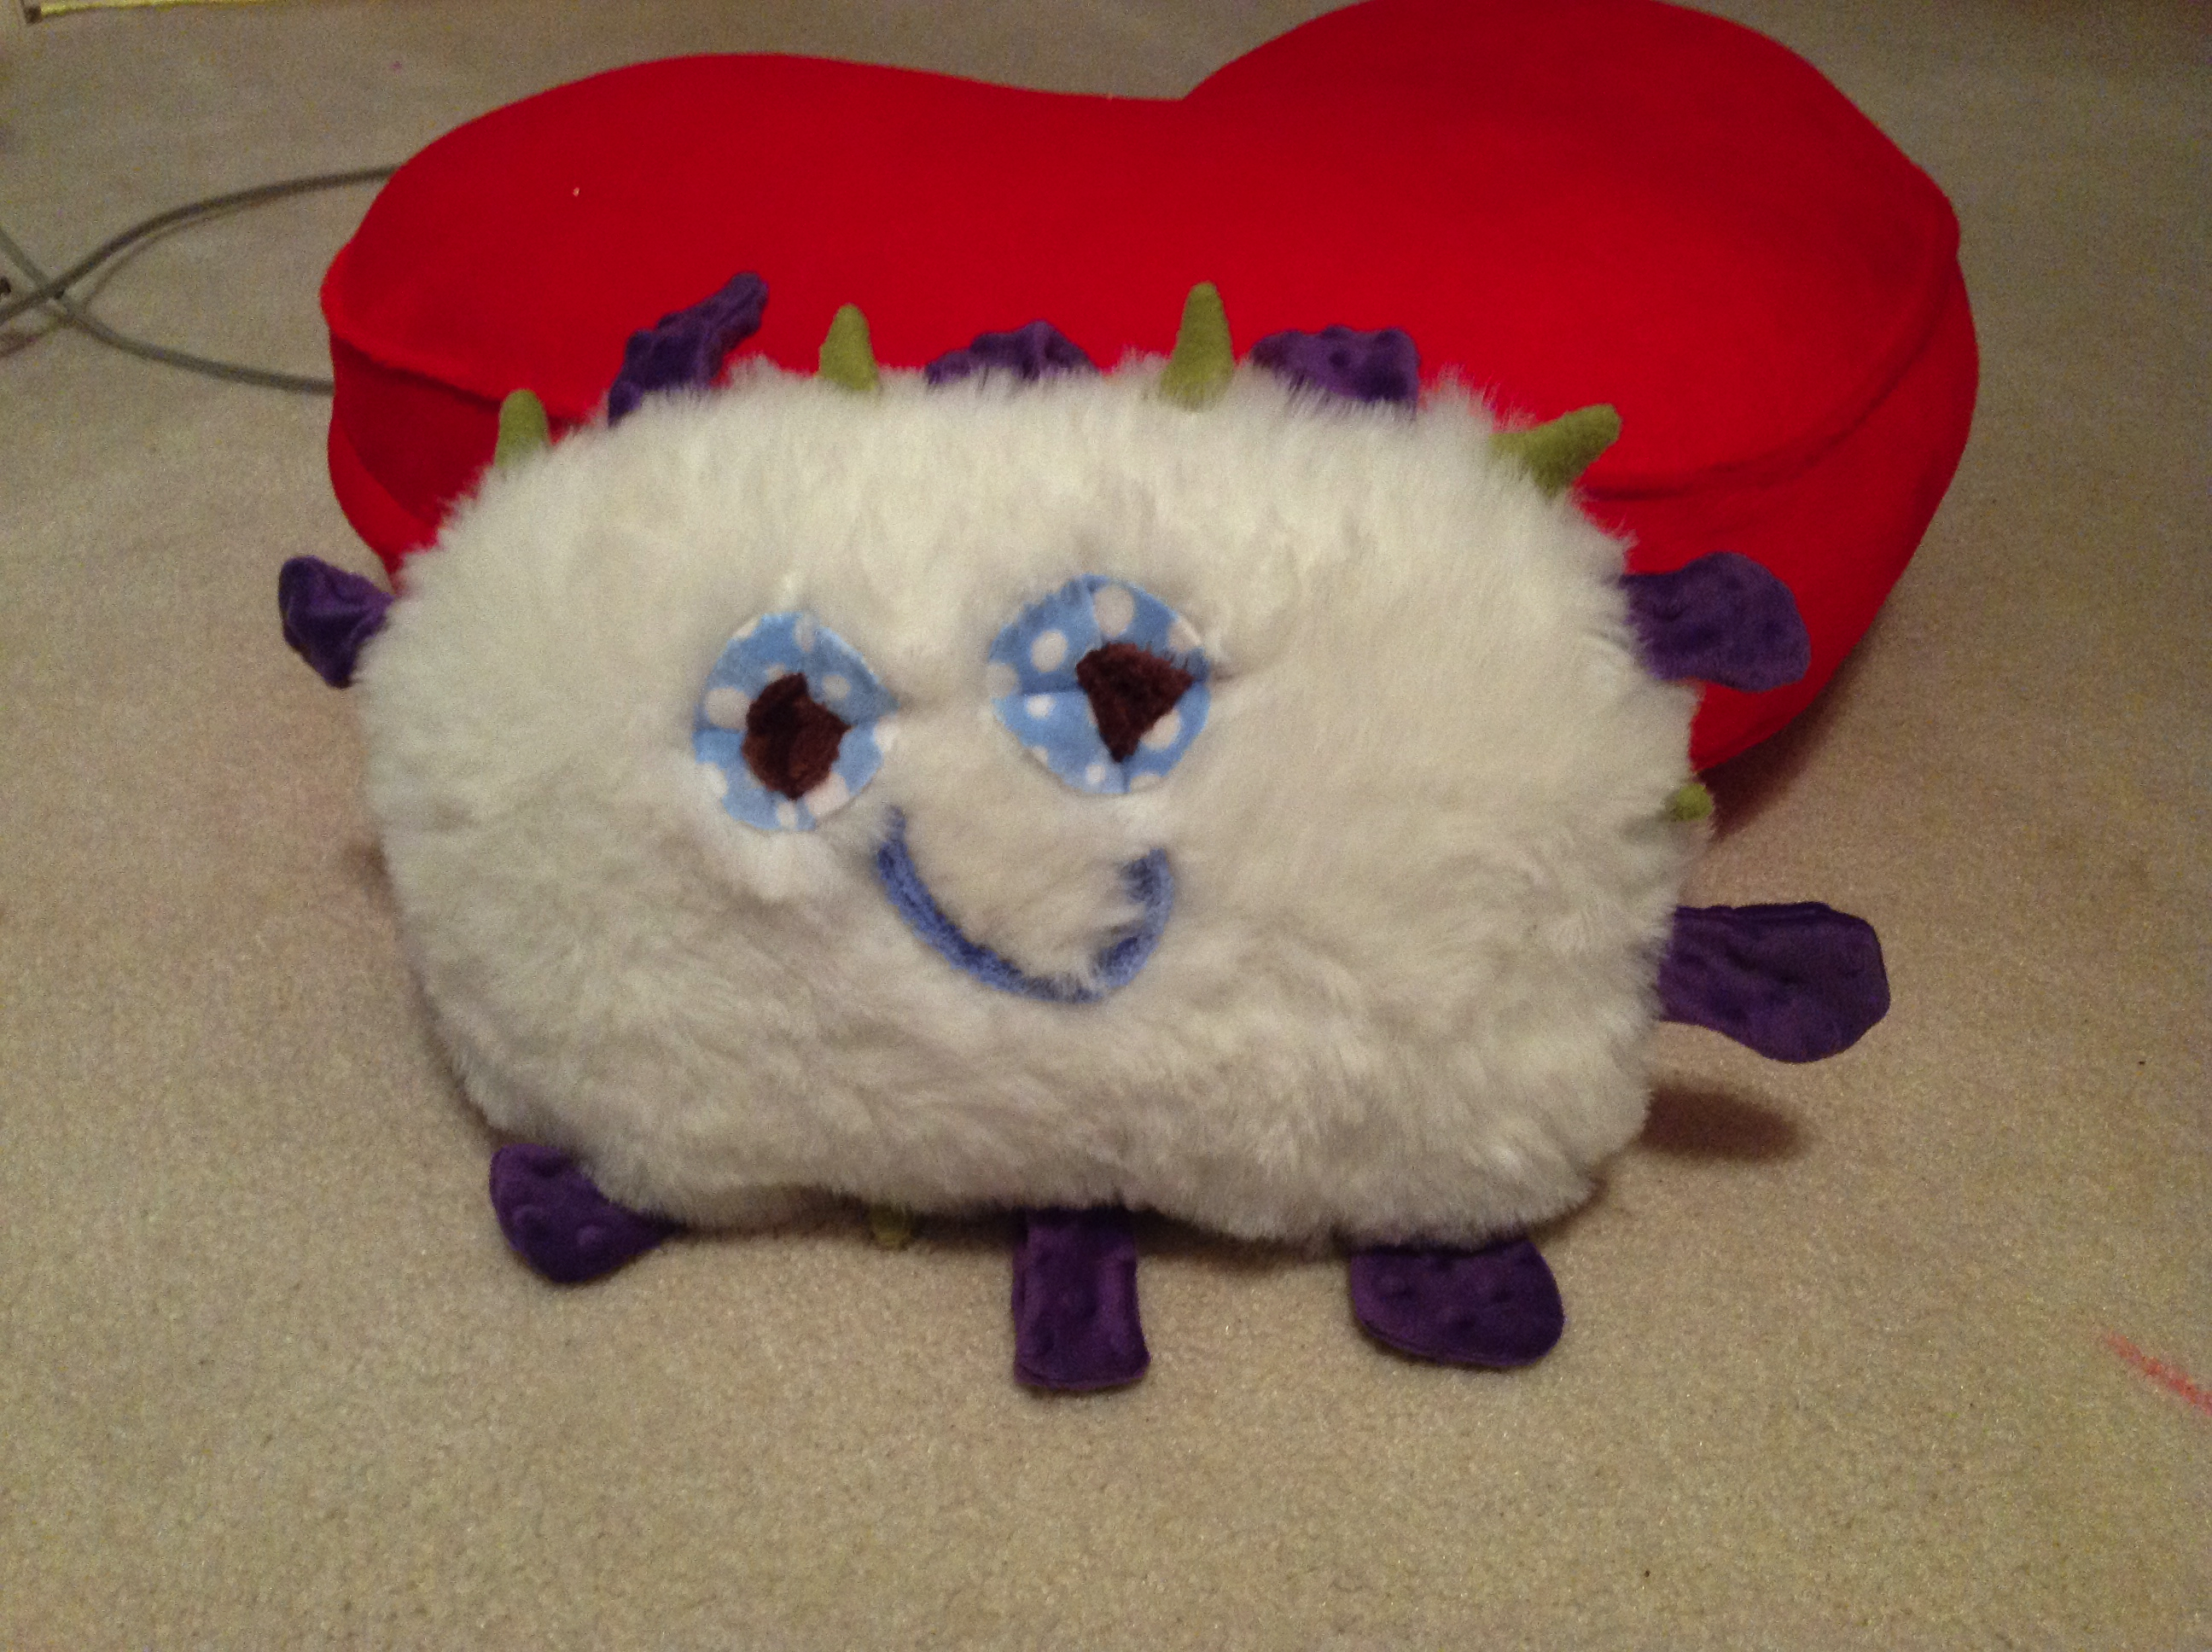
Here’s an unusual project I did over the weekend with my son – a stuffed Horned Nerite Snail. This is a real snail that tends to live in brackish water.
Inspiration for Stuffed Horned Nerite Snail
My son learned about them from a virtual aquarium game he has, and wanted to make one. Since we had to work with scraps from my stash, our color choices were limited which explained the electric orange color for the shell.
Stuffed Horned Nerite Snail
It took about an hour to make it. My son did the original design and selected the fabrics. He also drew the face. As a special bonus, he drew the templates and wrote his own directions for the pattern on a very wrinkled piece of newspaper. The templates were too small to actually use, so I made my own with his careful oversight. Next on the agenda is to make the snail a pair of pajamas, again based on my son’s design.
My pumpkin obsessed son already has me working on things for Halloween! Threads that Bind has a very cute pattern called Pumpkin Farm that makes five stuffed jack-o-lanterns. My son saw the pattern and insisted that I buy it. Now he is expecting me to make him one new pumpkin each day for the next week.
Crack the Pumpkin
“Crack” is the first pumpkin to be finished (although it will probably take a few more weeks to finish all five) and he turned out pretty cute. This is made with a very easy reverse applique process and only took about an hour to make. Since I know these pumpkins will get a lot of attention from my son (ie, he will eat, sleep, and play with them), I went ahead and used the cheaper wool felt blend for it. I don’t really care for this type of felt, it doesn’t look as nice and it pills quite easily. However, for a kid’s project, it’s just the ticket.
Last week, my husband discovered a nest of baby rabbits in our back yard! They grow pretty quickly and recently were big enough to leave the nest. It was hard to get a good picture of them since we didn’t want to disturb them. The mama rabbit would come by in the evenings to check on and feed her two little bunnies. They are so cute and we were sad to see them go, but maybe they will come back to say “hello” on Easter.
Baby Rabbits!
Speaking of Easter, you probably have everything you need for your baskets, but if you are looking for a fun and quick project, click HERE for my tutorial on how to make a Sock Bunny! I made these last year was very pleased with the results. If you have time, you can also make a colorful vest, dress, or bonnet for your rabbit.
I hope everyone had a great Halloween! I really enjoyed eating all of my son’s candy, and look forward to sneaking more of it now that he is in bed. We had a pretty rainy Halloween this year, so we ended up going to the mall for the main trick or treating. Everyone did a double talk when they saw this mini-reaper walking amongst them.
The Grim Reaper is ready for your candy!
I didn’t get a picture (wish I had been faster), but there was one little girl (probably around 2) dressed up like a flower princess and she was quite taken with my son’s costume. She kept smiling and laughing and wanted to come up and see his costume close-up. She wasn’t scared at all!
Even the Grim Reaper is not above the seatbelt law!
This year’s costume was fairly easy to make, but I finished it at 3:30pm today – just in time to go get the candy. I made his creepy black robe, and of course we bought the mask at the store. He was really pleased with his costume and how scary he looked!
My son wants to be a mad scientist when he grows up (see Exhibit A):
Mad Scientist
Today, he took a big step towards this lofty goal – starting Kindergarten! He wanted to bring an apple to his new teacher (where do kids get these ideas – TV?), so I figured a stuffed one is the way to go.
Basically (for sewing purposes), an apple looks like a tomato expect that it is taller. I made up a template that looked like an oval that came to a point at each end. The size was about 2″ x 5″. I cut out five (5) of these ovals from quilter’s cotton (although you could also use wool), sewed them together, and left one side open for turning.
Stuffed Apple for Teacher
Turn the piece inside out, stuff, and then hand sew opening closed. Get a small button for the bottom of the apple. Next, take an upholstery needle and thread with strong twine (I used linen thread). Poke the needle down into the center of top and come out through one of the button holes on the bottom. Poke the needle back into another button hole, come out through the top, and then pull tight. Do this 2 more time so that you can create a nice dimple in the top and bottom of the apple. Don’t cut the thread.
Next, cut out two leaves from felt and sew to the top of the apple. You can use the same thread you used for making the dimples. Tie off thread and cut off excess. Get a black pipe cleaner and cut it about 3″ long. Near the base of the leaves, poke a very small hole with scissors and insert the stem. You can use a dab of glue to hold into place. Voila – an apple for the teacher that will never spoil.
My son enjoys all kinds of creatures, both big and small. A few weeks ago he asked me if we could make a stuffed paramecium. He learned about these one-celled organisms from watching the “Cat in the Hat” (proof that television IS educational 🙂 ). For those of you who need a refresher in biology, here is a picture of what one of these critters looks like:
Diagram of Paramecium
As you can see, it is a simple oval, with some colored shapes inside the body, and a row of little hairs around the edge – simple enough to make with some fleece, felt, and pom-pom trim! This is a great project for you to do with your children since there are so many things they can do in the process. I didn’t take photos of the actual project in process, but the tutorial is fairly straightforward (I hope!).
Perry the Paramecium - Standing
To make one Paramecium toy you need:
1/2 yard fleece
Craft felt in assorted colors
3 yards pom-pom trim
1 bag Fiberfill
Google Eyes / Buttons (optional)
1. Starting by drawing 10 – 12 different shapes on the felt. Use a variety of colors and shapes to add interest. The shapes should be various sizes ranging from 2 x 3″ to 6″ x 6″.
2. Cut out the shapes and set aside. I found the shapes to be the most fun for my son. He drew and cut out all the shapes by himself. The bonus was that this kept him busy for about 2 hours (off and on) which gave me time to sew some other project.
3. Take 1/2 yard of fleece and cut it into two equal-sized rectangles (it’s easiest just to cut where the fabric was folded on the bolt). These will be the front and back of the paramecium.
4. Take one fleece rectangle and arrange the felt shapes on it. Again, my son did this step. He took each piece and placed it where he wanted on the creature. Be sure to leave about 1 – 2 inches seam allowance around the perimeter. Pin the shapes to the fleece.
Paramecium - Ready to Sew the Shapes
5. Using your machine, stitch the shapes onto the fleece. Stitch on top of the shapes (basically like raw-edge applique). Since this was a toy, I just stitched around the inside edge of each shape, leaving the edges of each shape raw. Don’t be a perfectionist about this, just get them stitched down securely. For example, I stitched through the center of each star point instead of trying to stitch around the perimeter of the star.
6. Take the pom-pom trim and loosely arrange in the shape of an oval around the perimeter of the fleece rectangle (the one with the shapes). You will have excess fabric at the corners. Caution – do not actually cut the fleece into the shape of an oval, this makes it harder to stitch together later on. Instead, just shape the trim into an oval shape and pin around the edges. Make sure the pom-pons are pointing towards the center of the fleece.
7. From the front, stitch around the pom-pom trim with your machine. You can use a basting stitch to complete this step more quickly.
8. Take the second piece of unembellished fleece and place it RIGHT SIDES TOGETHER with the piece you just finished embellishing. Pin around the edges.
9. Turn the piece over (pins and all) so you are now looking at the wrong side of the piece with all the felt shapes stitched onto it. With pins, clearly indicate where you will start and stop the seam in order to have a 6 inch opening for turning and stuffing (pick the center of one of the long sides).
10. You should be able to clearly see the stitching line around the perimeter that is securing the pom-poms. Using this seam as a guide, stitch the front and back together just inside this seam (about 1/8″ seam allowance). Again, no need to be a perfectionist about this. Remember to leave 6″ open for turning and stuffing.
11. Trim corners so that you now have a nice oval shape. Turn the paramecium inside out.
12. Stuff with fiberfill. This will use an entire bag of fiberfill! Again, kids can participate in this step and handle the stuffing themselves.
13. Once stuffed, whipstitch the opening closed by hand.
14. Optional: Glue on google eyes or sew on button eyes. My son opted to draw some eyes and mouth in the middle with a marker (can you see it in the picture?). However, he did mention he would like to sew on some buttons for eyes so you can see them better.
15. Name your new creature! My son called his “Perry.”
Miraculously I finished both the ballet bags and lunch bags that I posted about last week! I was pretty pleased with how both projects turned out, but also glad I didn’t have the pressure of sewing deadlines! The next big deadline I have is getting ready for the Porch Sale in October (more details later).
Lunch Bags
Heather Bailey’s Jack and Jill pattern is very cute, but the bags were not as simple to make as I thought. And since I was making two bags at the same time, any missteps I made were multiplied by two! Laminated fabric was used for both the interior and exterior – this is a medium weight fabric that is lighter than oilcloth, but sturdier than cotton. It was very easy to work with – and I had no issues with cutting or sewing with it. I did have a teflon foot which made the fabric slide very easily through the feeddogs. If you don’t have a teflon foot you can also use the walking foot.
The pattern instructions were clear enough in most places, but I think she may have missed a minor step when you have to cut out the fabric for the side tabs. Easily remedied, but it slowed me down because I spent a few minutes looking for the missing step.
Lunch Bags with Accessories
The thing that is most confusing is keeping the top and bottom oriented correctly on the top flap. The finished flap works just like a brown paper lunch bag – you pinch in the sides and fold over the top twice. Velcro secures the flap, so precise placement of the hook and loop strips is important. You must also stay on your toes when sewing the lined flap to the bag body so you don’t sew it in upside down. This is very easy to do – take it from me :). I spent about 30 minutes ripping out stitches since I didn’t realize my mistake until three seams later! Thanks goodness I didn’t make the same mistakes on both bags.
Once finished, I added in a plastic sandwich holder and small soup-thermos (color coordinated, of course). The teachers loved them!
Ballet Bag for Pointe Shoes
The second project were the ballet bags from my friend April. I plan to post a tutorial about how to make them in the near future – so stay tuned! The cute thing about these bags was the monogram in the lower corner. You can use the iron-transfers for the craft store – there are many styles and colors to choose from.