Five years ago, my brother gave me a box of 3.5″ and 6″ squares cut from vintage Hawaiian shirt fabric and asked me to make a quilt. I found the perfect pattern in the ScrapTherapy book by Joan Ford. I’ve worked on it off and on for the past few years, and finally finished it!
This quilt has over 1,000 separate pieces and lots of triangles. I tried to set up somewhat of an assembly line to sew and trim the half-square triangles. Every few months, I would pull out the project and do a few more half-square triangles.
The best part was figuring out which squares to pair with the half-square triangles in order to make the fish. I think the fish turned out great and I really like how the blue fabric makes them pop!
What long-term project have you finally finished? Comment below!
My son is crazy about mushrooms. Last year for Christmas he wanted a book titled Mushrooms of West Virginia and the Central Appalachians (of course he got it!). He came up with this fun little mushroom craft that requires very few supplies.
Supplies Needed:
1″ Wooden spools or knobs (one for each mushroom)
Fabric scraps to make 2 1/2″ circles
Thread
Glue
Markers
He rooted through my scrap basket and selected about 11 different fabrics that looked like mushroom tops. Batiks work well for this, as do tone on tone prints. He also found that the reverse side of the fabric would sometimes work.
Next, cut out a 2 1/2″ circle from each fabric scrap. Using a needle and thread, sew a running stitch about 1/3″ in from the edge. Gather the circle and add a small bit of stuffing. When making the first one (pictured above) we placed the wooden spool instead the gathered circle and pulled the thread tight, and tied it off. This was pretty awkward and too some time to get the thread tight enough. For the other ones, we gathered up the circle, stuffed it, tied it off, and then glued the “puff” on top of the wooden spool. That worked much better and was even cuter!
Once the mushroom is dry, use a green marker to draw a bit of grass at the bottom. If you like, add a smiley face!
I cut out a piece of green felt for the meadow and gave him a plastic Crystal Light container for storage. Viola! A portable mushroom meadow!
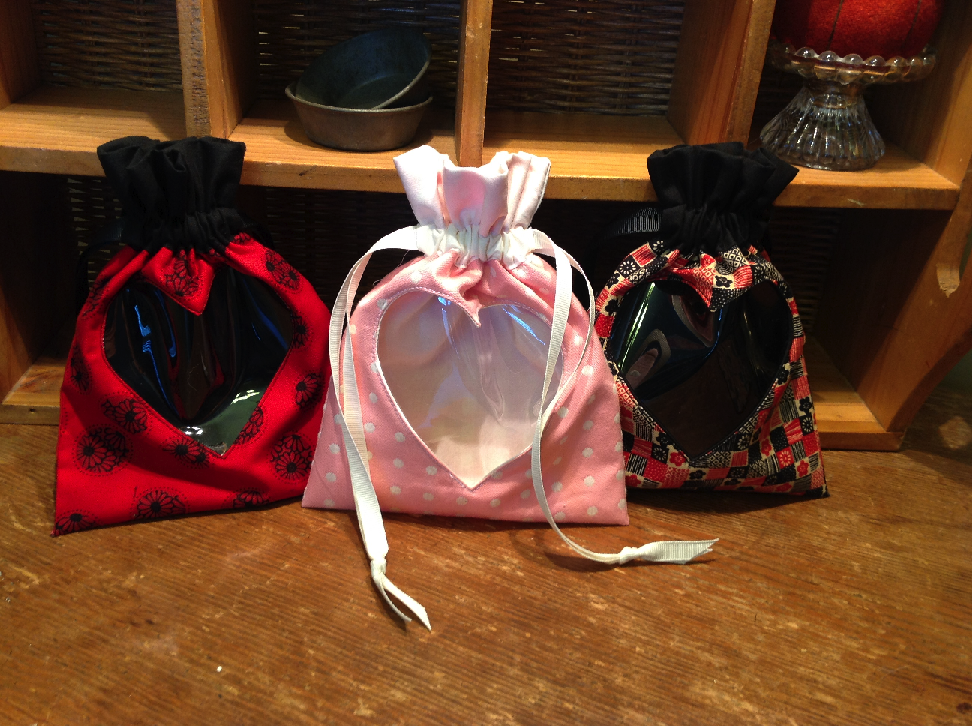
I found the tutorial for these drawstring pouches at Twinkle and Twine. They are so cute and very easy to make. I made six in one afternoon, I could have made more, but ran out of vinyl for the windows. The tutorial has great directions, even for beginners.
I plan to make these with other cut-out shapes for different occasions – a baby rattle, christmas tree, cupcake, and so on. I’m even going to make one with a thimble, of course!
I can’t believe it’s almost the end of January! This year I am focusing on finishing projects that have been 90% finished for a few years. So far I’ve put the binding on three quilts and have prepped three other quilts for the longarm quilter. In between finishing projects, I am doing smaller projects that can be finished in a few days.
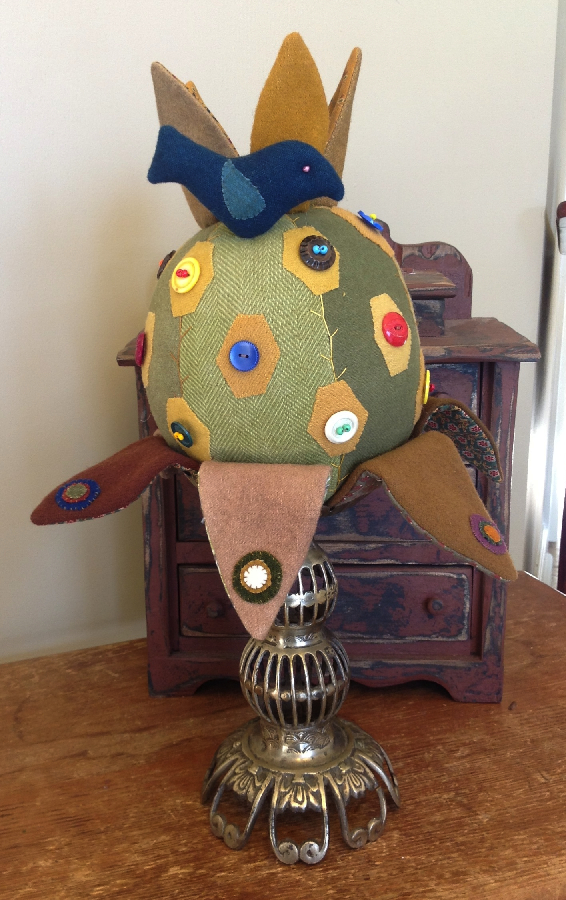
This is the Pineapple Pinkeep from a pattern by Sue Spargo. I saw this pattern years ago and always liked it, but never made it. During one of my thrift store visits, I found this beautiful brass candle bass for 3! When I saw the base, I knew it would be perfect for the Pineapple Pinkeep.
This project was a lot of fun to put together. Picking out the wool and buttons to use was the best part. I also spritzed the wool with some walnut crystal spray so it wouldn’t look too bright (especially on the leaves). The pineapple is the perfect way to “welcome” in the New Year!
One more day until the candy bonanza! My son already went trick or treating at two events this weekend, so we already have a good start. His plan for Wednesday is to stay out until he fills an entire grocery bag with candy.
Halloween Pillow with Ruffle
In between all the Halloween stuff, I made this Halloween pillow from some scraps leftover from another project (to be posted in a few weeks). I used the scraps to make the patchwork squares, and then made them into a simple nine-patch block by using an orange fat quarter.
Ruffler Foot
I was originally going to put pom-pom trim around the pillow, but I figured this was a good opportunity to teach myself how to a the ruffler foot. As you can see from the picture, ruffler foots are kind of scary (thus, perfect for Halloween) and intimidating. I didn’t even know how to attach it! Thanks to the internet, I was able to find a few videos that explained the process and I was on my way. Once the foot is attached, it really is quite easy to use. Soon I had 3 yards of ruffled material in no time flat.
I was going to stuff it with Fiberfill but then decided to splurge and get a pillow form instead. Using it makes a huge difference in the shape and finished look of the pillow. The back has an envelope opening so you can slip the pillow form in and out in case you need to wash it.
Wow, the summer is almost gone and I still have so much I wanted to accomplish. However, I had a great summer so I’m not complaining. I promise to get back to more regular posts this fall. Everyone deserves a summer break, don’t they?
In order to get inspired for writing up some new patterns and tutorials, I decided I needed a little inspiration. The sewing room is looking a bit drab because I haven’t made the curtains yet (which will be in a very vintage and cheery looking Minnick and Simpson fabric). So I decided to create a sewing machine cozy!
Sewing Machine Cozy
The tutorial is from Strawberry Patches and I figured this would be the best way to bring in a dash of cheer and inspiration to the room. Once the cover was completed, it seemed like it was missing something, so I decided to applique my favorite sewing slogan on it – and voila! – a constant and fun reminder of how to approach life.
For the applique, I used Steam a Seam 2, which is double-sided fusible web. I cut out the letters, fused them on, and then did a basic zigzag stitch around the edges to hold them in place. I love how it turned out!
School will be out in 15 days (!), and it’s time to think about end of the year teacher gifts. Teachers always appreciate a gift card, but it’s also nice to make them a little something just so the gift is more personal. I was trying to think of something fun and easy, since my son has lots of teachers, and then I remembered the good old travel tissue holder! You can tuck the gift card in the opening, tie a pretty bow around it, and it is the perfect teacher gift.
Tissue Covers
There are a lot of tutorials online on how to make these, so I figured it would be fun to share some of them with you and show you my finished results. For mine, I used a tutorial posted at Melinda’s Quilts, ETC (http://melinful.blogspot.com/2010/01/travel-tissue-cover-tutorial.html). The reason I liked this one is because it just uses two pieces of fabric (exterior and lining) and is sewn in a way that makes its own trim on the edges of the opening. It literally took me 10 minutes to cut out the fabric and sew it together.
Press Seam Open
After sewing the tube, I used my point presser and centered the seam on the top part so that the seam could be pressed open (see above).
Pinked Raw Edges
In addition, the raw edges were cut with pinking shears to prevent them from raveling. This gives nice finished edge and you don’t have to mess with bias tape.
Back of Tissue Holder – Fussy Cut
Lastly, on one of the covers I fussy cut the fabric so that the floral motif was centered on the back of the tissue holder. Also, these are great stashbusters – you only need 2 scraps of fabric less than 8″ square for each one (and a packet of travel tissues from Target).
Here are some links to some other tutorials:
Sew Much 2 Luv has a fun tutorial that uses 4 scraps of fabrics.
The Distracted Domestic has a tutorial that is a variant on the method Sew Much 2 Luv uses – but it uses just one strip of fabric.
Whimwham at Craftstylish posted a tutorial that shows you how to add some fancy machine embroidery on the front. This is a great way to personalize the gift.
Craftapalooza at Whipup discusses her LAB technique for making these. She uses trim around the opening for a nice contrast.
What are your ideas for teacher gifts? I’m always on the hunt for more fun and easy projects.
Happy May Day! To celebrate, the Radiant Folded Patchwork Star and covered box pattern is on sale for $2.99.
Radiant Folded Star and Covered Box
You can use the Folded Star in a variety of ways – table toppers, covered boxes, clothing and accessory accents, and more!
This pattern includes full step by step directions for both a fabric covered box and a table topper. Photographs of key steps are also included.
These Folded Stars are fat quarter friendly, great stashbusters, and useful for scraps! Use Christmas fabrics to create a festive holiday table topper. Use pastels or batiks to create a striking storage box. Make a scrappy star to complement your latest quilt. The possibilities are endless! The pattern is easy to make and requires little sewing. This is a great project for kids and confident beginners.
You are purchasing a PDF pattern which will be available for immediate download after purchase. After your payment is processed, you will be e-mailed a link from which you can download the pattern.
Looking for a quick gift or a fun home dec idea? Here’s a set of Pretty Patchwork Heart Pockets that can be sewn together in about an hour. This tutorial includes directions for making both versions!
Pretty Patchwork Heart Pockets
Make a bunch of these and place in a pretty basket or bowl. Use clothespins to attach them to ribbon and create a fun garland or window swag!
Pretty Patchwork Heart Pocket - Version 1
You can use scraps for this and make them in a variety of colors – red and white for Valentine’s Day, green and white for St. Patrick’s Day, red/white/blue for Fourth of July, orange and black for Halloween, or red and green for Christmas!
Pretty Patchwork Heart Pocket - Version 2
The back features a small pocket. Tuck in a gift card or some dried flowers.
Pretty Patchwork Heart Pocket - Back View
From Fabric A cut:
Three 4.5″ squares
One 5.5″ Square
One 3.5″ x 2.5″ rectangle
From Fabric B cut:
Three 4.5″ squares
One 5.5″ Square
One 3.5″ x 2.5″ rectangle
Take one Fabric A 4.5″ square and one Fabric B 4.5″ square. Pin the squares right sides together and sew a 1/4″ seam on the right and left sides. Make two sets (Figure 1).
Figure 1 - Sew Side Seams
Cut these units into three rectangles that are 1.5″ x 4.5″. Make sure you are cutting parallel to the seams you just made (Figure 2). Do this for both sets.
Figure 2 - Cut Into Strips
Press the seams towards the darkest fabric to create two pieced units (Figure 3).
Figure 3 - Press open
Take the center rectangles and sew them to the appropriate side of the pieced units (Figure 4). Press the seams to the darks. You now have two units of alternating fabrics (A-B-A and B-A-B). Make two sets.
Figure 4 - Sew Strips to Create Squares
Take one of each type of square (A-B-A and B-A-B), make sure stripes are going the same direction, and pin them right sides together. Sew along the shorter sides with a 1/4″ seam. Do this for both sets. Cut each set into three rectangles that are 1.5″ x 4.5″. You will be cutting perpendicularly to the stripes (Figure 5). Press the seams.
Figure 5 - Sew Side Seams and Cut Into Strips
Sew the center strip to the appropriate pieced unit to make TWO nine-patch blocks (Figure 6). Do not sew the other strips to make blocks. You will now two nine-patch blocks and two sets of partial blocks.
Figure 6 - Sew Two Nine Patch Blocks
To make Version 1, sew the partial blocks onto one nine patch block (Figure 7).
Figure 7 - Create Version 1 Heart
Take make Version 2, sew the 3.5″ x 2.5″ rectangles onto one nine patch block (Figure 8).
Figure 8 - Create Heart Version 2
Set these two heart fronts aside and make the pocket. Take the remaining two of the 4.5″ squares, and press it on the diagonal right sides OUT (Figure 9).
Figure 9 - Make Pocket
Take one of the 5.5″ squares, place it right side up, and then pin one of the folded triangles on this to make the pocket. For best results, use contrasting pocket on the backing fabric (Figure 10).
Figure 10 - Pin Backing to Pocket
Pin one heart front and one heart back right sides together (Figure 11).
Figure 11 - Pin Backing and Heart Right Sides Together
Download Heart Template here. Trace onto piece of cardboard and cut out template. In order to create sewing line, place template on pinned hearts and trace around it (Figure 12). DO NOT CUT. Sew around the line you just drew – leave a 3″ opening in one side for stuffing.
Figure 12 - Trace Around Heart Template
Cut off excess fabric and leave about 1/4″ seam. Clip corner, curves, and heart center. Turn inside out (Figure 13). Stuff lightly and hand-stitch opening closed.
In keeping with the theme of reducing and organizing your stash, let’s discuss the “scrap problem”. Right now, my scraps are stored in a single plastic bin. However, when I take the lid off it literally explores from all the fabrics I have stuffed in there. This method also makes it difficult to track what colors and styles of fabric are there.
Scraps gone crazy!
Since the Scrappy House blocks are made from scraps, this bin needs organized so that the blocks can come together more quickly. The first one was finished yesterday and only 18 more are needed in order to be caught up! I plan to work on them this weekend so that things are back on track by Monday.
First Scrappy House Block!
The first one turned out really cute. This uses some of the modern fabrics in my scrap bag – do you see the little bird in the window? My plan is to mix up all the fabric styles. It will look nice and scrappy when completed. In order to give the final piece some unity, the same black and red fabrics will be used to create the border and corner stones that surround each block. The search is still on for these two fabrics.
Anyway, back to to the scrap problem. I purchased 8 clear plastic shoebox bins and will be organizing the scraps by the colors of the rainbow (black/white for the last bin). This seems to be an easy way to get them in order for now. Since I have so many vintage scraps, these will be organized in another set of bins.
How do you organize your scraps? Please post your suggestions in the comments section.