
Pincushions are a great project since they are small and only take a few hours to make. Plus, you can never have too many! This tasty treat is from Miss Rosie’s Fruit Salad pattern.
Keep it Thimble!

Pincushions are a great project since they are small and only take a few hours to make. Plus, you can never have too many! This tasty treat is from Miss Rosie’s Fruit Salad pattern.
Keep it Thimble!
It’s been awhile, but I haven’t forgotten about you! Hopefully, I can get back to a more regular posting schedule. I am doing plenty of projects, just haven’t had the time to show them off.

This is a little pin cushion and a needle case made from selvages. I must admit,this is kind of addicting and the possibilities are endless once you have the basic selvage blocks completed. The needle case pattern from a book called Save the Selvages. The book contains all kinds of small projects you can make in just few hours.
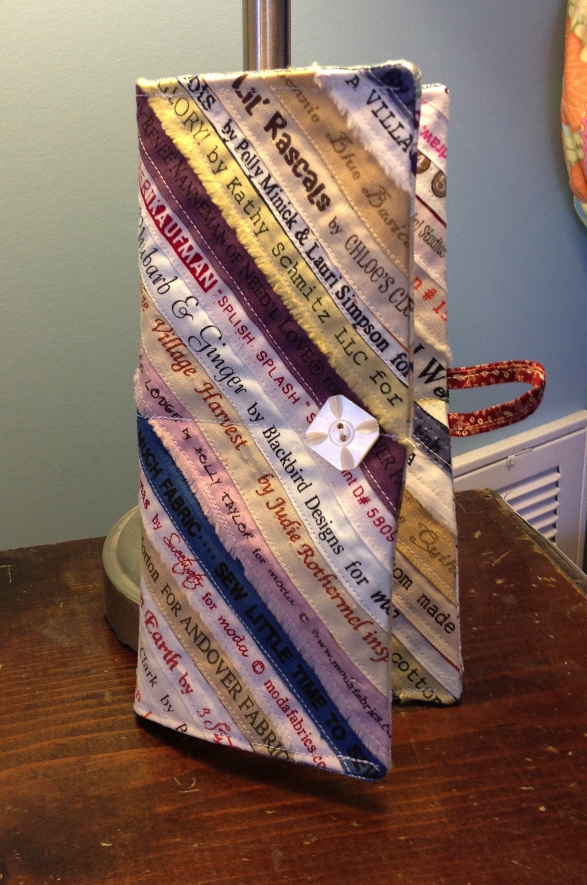
Here’s a pattern for what the book called a tea bag holder, but I used it for a wallet and check book cover.
Start saving your selvages and see what you can make! Keep it Thimble!
I still owe you a report on my trip to Alaska and the quilt shops, and you will get that before the end of the year. However, I have been busy working on some fall projects and should have lots to show and tell in the next month or so.

Here’s a cute fabric covered box that I made from a class I took at Liberty Rose. Sharon thought of this idea and taught it as a class. This is one of my favorite projects because it only takes a 2 or so hours to complete from start to finish. When done, it looks like something store-bought!

I found this Sara Lee Bakery Display at the local antique store. It’s the perfect place to store all my works in progress. As you can see, I have quite a few projects going on right now. Most of these are 75% complete and will be done in the next few weeks. Stay tuned!
Keep it thimble!
September is National Sewing Month. Let the sewing begin! I hope to get back on a more regular schedule with my posts. Things are calming down to a dull roar around here, so I should be able to post more often.
Here’s a little before and after project I did this week. What do you think? I found this chair at the thrift store for 50 cents. It seemed so sad sitting on the shelf, so I rescued it.

I painted it and made new cushions with the same fabric I used on my sewing machine cover. I think it turned out pretty cute! Now I just need to load it up with sewing notions.

Keep it Thimble!
Happy Birthday to me! Yes, today is my birthday – one of my favorite days of the year (besides Halloween and Fourth of July) and I thought it would be fun to celebrate with a Cupcake Pincushion.

Awhile back during one of my thrift store runs, I bought a bunch of plastic ramekins with the idea of making something with them. Inspiration struck me when I was trying to come up a fun gift for a sewing friend and this cute little cupcake pincushion was born. In honor of my birthday, I put together this tutorial for you.
Supplies Needed:
1. Trace around the saucer on the square of fabric. The circle should be roughly 5 1/2″ in diameter.
2. Thread an embroidery needle with a 36″ piece of perle cotton. Make a running stitch around the outside of the circle with about a 1/4″ seam allowance. (Figure 1)

3. Gather the circle and stuff tightly with Poly-fil. Gather tightly and tie off, but leave about 28″ of thread for the long tail – do not cut. (Figure 2)

4. Poke the needle through the top center of the pincushion and come out at the bottom center. Wrap perle cotton around edge of pincushion and come down through the top center again. Pull on thread to make tight (cushion will dimple on the side). Wrap cotton on the opposite side and come down through top center again and pull tight. Proceed in this manner until you have done this a total of 8 times. The cushion will now be segmented into 8 parts. (Figure 3)

5. Bring thread up through center one more time so that it is coming out through the top center. Take red button and place in top center of pincushion. Thread the perle cotton through button holes and then down through bottom to secure button. Repeat 2 – 3 times. (Figure 4)

6. Apply glue to inside of ramekin. (Figure 5). Place cushion inside ramekin and let dry for a few hours.

7. Cut 18″ of ribbon. Use glue dots to secure ribbon to outside of ramekin (place glue dots about every inch around top). Tie into a bow. Put a dot of glue to secure bow. Add some pins. Enjoy! (Figure 6).
Have a great day and eat some real cake.
Keep it thimble!

Sewing gadgets can make life easier, and if they are the right price, I am happy to try them out. Some of these things include a bobbin winder (used twice), a 1/4″ rule for marking seams (used a lot!), and the Dritz EZ Hem (used once for this dress). As you can see, even when you have the right tool for the job, you may not find that it is a must-have (just a fun to have). However, there are 5 sewing tools I can’t live without.

This gets used all the time! I used to get frustrated whenever I had to rip out a seam, but now I find it kind of therapeutic. Seam ripping is a nice break during a marathon sewing session. Also, once I learned the correct way to rip out a seam, the job was much faster and easier. There are two seam rippers I recommend (having used both quite a bit): the ergonomic once by Clover and the Dritz one that folds (which is nice for travel). The main thing is to pick a seam ripper you can easily hold in your hand without it cramping up.

An iron is on this list, even though it is probably not considered a sewing notion, but it is a necessity. There are wide variety of opinions on which one is best. Many people swear by their $20 iron, while others say that the more expensive irons are worth the money. I’ve had experience with both types and I find the more expensive irons (like a Rowenta) really do work better for quilting and sewing. This is because of several reasons — and if you can find a cheaper iron that has the following features, get it:
The first thing to consider is the weight of the iron, a big heavy iron is going to work better since the natural weight of the iron makes it easier for you to press down and get a nice flat seam. Some people find that an iron can be too heavy and thus tire out their arms, so keep this in mind. The temperature is another factor in how well your iron works – you want a iron that can get nice and hot, especially when working with cotton – the hotter the iron, the flatter the seam. The final thing to consider is steam – more expensive irons have more holes for the steam to escape, which makes better use of the steam. One caveat is that if you store your iron with water inside, it is more likely to leak. I have heard that keeping water in the iron is the biggest reason why irons start leaking and break down. Each time I finish with my iron, I empty out the water, and I also run the self cleaning function a few times a month.

Again, this is an area where you can spend a little or lot of money. After comparing scissors, I splurged and bought Ginghers (made in the USA!) –8″ dressmakers shears for cutting fabric, 7″ craft scissors for ribbon, wool, and foundation piecing, and a 4″ utility pair for embroidery and applique (also good for travel). There are several reasons that Ginghers are worth the money. First, they accurately cut all the way to the very tip of the blade. This is especially important for detail cutting, where you don’t want to risk a slip of the scissors. They are really sharp and can through cut several layers of fabric at once. They are LIFETIME scissors, meaning they will never wear out and I can send them to Gingher at anytime to get them sharpened (for a nominal fee) and they will be like new again.
One interesting thing to note is the difference between scissors and shears. The word “scissors” is used interchangeably between the two, but there is a difference Scissors are usually smaller, and feature two similar sized round holes for your fingers. The handles are separate and made of plastic while the blade part is metal.
Shears feature a round hole for the thumb and a larger oval hole for the rest of your fingers. This makes the shears easier to control when you are cutting fabric. The handle and blade are made out of one piece of metal. , which means that shears are two metal “scissors” held together by a bolt.

Oftentimes while sewing, there is a need to mark the fabric. For example, you may need to draw lines for quilting, divided pockets, o r a hemline. The chalk wheel marker makes a nice sharp line and wipes off very easily. For a few dollars you can purchase a bag of chalk dust for refills and it last a loooong time.

Pincushions are something I can’t live without. They are pretty, functional, and fun to make. I have three that get used on a regular basis, and several others for decorative purposes. They are great scrap busters and you can make them in variety of shapes and sizes.
From a functional standpoint, pincushions are much easier to use — you don’t have to worry your pins falling on the ground as you add and remove pins to your project. If you want to get fancy with your pins and needles organization you can section off the pincushion by type – needles in one section, applique pins in another, and quilting pins in a third.
Finally, the tomato pincushion is pretty much the universal sewing symbol. Why the tomato you ask? According to some, people used to place a ripe tomato on the mantle of a new home to guarantee future prosperity. However, in those days, tomatoes were not available year-round (or would rot easily), so a round ball stuffed with sawdust or sand was used instead. These balls were the perfect place for storing pins, thus the tomato pincushion was born. The strawberry that is attached to most pincushions is filled with emery which is useful for sharpening pins. I wasn’t able to find an explanation for how the strawberry got added to the pincushion…if anyone knows, please enlighten us!
Since everyone needs a pincushion and a place to store all their odds and ends – a Shaker Pincushion is the perfect solution. Click here for my free pattern. Enjoy!
Keep it Thimble!
This is the last week before the big Porch Sale in the Barn. I can tell you I will be happy and relieved when it is over! One of my friends is coming over on Tuesday to help me get everything priced and organized. I have been busy this weekend making a few items and am pretty happy with how everything looks – so I hope everyone else like them too!


Also, for those of you who have been eagerly waiting for my first pattern (which I said would be available in September), you are going to have to wait a bit longer. Real life just has a way of side-tracking my sewing plans – so I had to put pattern design on hold for a bit longer. After the porch sale I should be back to my normal amount of “too much to do”.
Keep it Thimble!
It’s a busy week as I get ready for the Porch Sale on Oct 14th. Here are a few sneak peeks – as you can see there is still a bit of work to be done!


I also got this steam press today. I used one of these a long time ago in a class and found it is wonderful for ironing interfacing onto fabric and saves so much time! Since I am making things in bulk, I need to find ways to save time.

Keep it thimble!
The birds are chirping the flowers are blooming, and spring is finally here (I think). Last week we had a blast of winter weather and we are supposed to be in the 30’s tonight. But after that, it is supposed to be consistently in the 60’s and 70’s for spring!

Here’s a cute spring project – a nest of Easter Peeps! The original pattern from Liberty Rose was a much larger chick that could be used for a pincushion. I downsized it and stitched it up in some yummy spring colors! You could also make some cute Easter Rabbits and use brown floss to add in the distinctive Rabbit Peep face – 2 small dots for the eyes and one for the nose (note: writing this on my to do list).

This spring pillows were also inspired by Liberty Rose! These are really easy to stitch up and are great accents for your spring decorating. Pick out a few vintage images (we used postcards) and then transfer them to fabric. You can buy the photo transfer fabric at Jo-Ann’s (bring your coupon). Cut out, sew on a backing, and stuff – viola! The neat thing about this is that you can use any image – there are lots of goods ones the internet, just do a search for “vintage ____ images”.

Happy spring and Keep It Thimble!
Brenda Gervais has a cute little pincushion called Emery the Sewing Mouse – perfect for any sewing room! I couldn’t resist him , especially with that little thimble hat!

This is a fun afternoon project that requires a bit of this and that. You cut out the mouse body in wool, stitch around the body, arms, and legs and turn these all inside out. The arms and legs are especially challenging since they are so small. Hemostats are great for turning these small pieces since you can working the tips into small openings and get a good grip on the fabric to turn it.

You also do a lot of handwork on this. You stitch the arms and legs on by hand, and then use embroidery floss to create his beady little eyes and pink nose. I added a little mouth as well, so that he has a crooked little smile.

The thimble is glued one (Allene’s Quick Grab is good for this), as is his tail (which is a rusty piece of wire twisted into a tail shape). The strawberry is sewn on the machine and stuffed with a filling of sand, sawdust and fiberfil. Once stuffed, you tack on the green cap by hand. The project is finished when you stitch Emery down on the strawberry. How cute is this?
Keep it Thimble!
