


Keep It Thimble’s photostream on Flickr.
Category: Applique
Tomato Penny Rug
Tomatoes always remind me of summer time and sewing! I’m sure you can remember your grandmother’s well-worn tomato pincushions. My friend Liberty Rose loves tomatoes pin cushions so much, she made this delightful pattern for a tomato penny rug.

I started this project last summer and it is listed as one of the UFOs to finish for this year. It can now be crossed off the list. Right now it is sitting on top of the antique spool chest in my sewing room! This is the fifth penny rug I’ve made in the past few years. These little projects are fun to make because you can easily carry a few pennies around in your purse and stitch on them when you can. Pennies are also fun because there is so much you can do with this as far as embellishments and embroidery!
I have a few ideas for my own penny rug designs based on Liberty Rose’s basic template (with her permission of course). I plan to get the patterns finished up by the end of the year as part of the pattern line I am creating.
Also, I have decided on the date for the quilter’s yard sale – July 23rd from 8am – 12pm. If you want to do some virtual shopping, just let me know. For those of you in the area, stop by (email me offline for my address).
Keep it Thimble!
Crow Pillow
Renee Plains is one of my favorite designers and I have been meaning to make a project from her “Bird In the Hand” book. This little pillow attracted me because it was small and featured needle-turn applique – a technique I’ve been wanting to try for awhile.

The original project features the word “Bird” across the top, but I change mine to say “Crow.” I also made the linen square in the bottom left larger and embroidered the word “buttons” – I thought this added a nice touch. Finally, I added a few french knots on the strawberry so it looked like it had seeds (the lighting is not so great so it is hard to see the berry agains the red background).
Sharon at Liberty Rose was kind enough to show me the basics of needle-turn applique, and it is really isn’t as difficult as it seems. I do agree it will take some practice to get good at it so that my appliques look nice and have tiny stitches. However, if I can learn how to do it well, it will save me a lot of time! I have done both the templar/starch method (tutorial by Suppose Quilt Boutique) and freezer paper method (tutorial by the Golden Thimble) and find these both to be time consuming since a lot of time is spent “prepping” the shapes before they are sewn onto the background.
Both of these methods are easier for newbies to use since they eliminate a lot of the guess work of how much of the edge you need to turn under before you sew. One reason why I really enjoy wool applique is because you can just cut and stitch – no extra steps to get the shapes ready – so projects can go pretty quickly.
Also, I have been doing a major clean out of my sewing room and will be having a crafter’s/quilter’s yard sale in a few weeks. I plan to sell off part of my stash and other miscellaneous crafting supplies that I haven’t used for at least a year. If you are interested in finding out the details, please email me (email link in the upper right of my blog).
Keep it Thimble!
Springtime Table Topper
I guess the groundhog was right, Spring is coming early this year! For the past week, we’ve been having 60 degree weather – perfect for going outside and sewing! Here’s a cute Springtime Table Topper I made from a Kansas Trouble Quilter’s pattern in celebration of Spring.

This is fusible applique, which is a lot faster than other types of applique. With fusible applique, you trace the shapes onto a fusible backing, cut them out, arrange them on the background, and then fuse them down with the iron. The last step is to do a small zig-zag stitch around the edge of the applique pieces to secure them. This is important because if you forget to sew them down, all the appliques will fall off when it is washed!
After I stitched down the appliques, I did “echo” quilting around the flowers. “Echo” quilting is when you trace around the outline of the shapes in a continuous line until you get to the edge of the quilt. In the middle of the quilt I did a simple spiral shape. My machine quilting is not so great, so the spiral seemed like the easiest option. After quilting, I used bias binding to finish it.
Keep it thimble!
Happy Valentine’s Day!

Happy Valentine’s Day!
This is a quilt top that is currently on my UFO list because it still needs to be quilted. However, I thought it would be appropriate for today’s post :).
This split applique is very easy to do – I learned how to do it in a class taught at Plain and Simple. Basically you create a heart template in 3 sizes – small, medium, large. You get scraps of red fabric and cut out one of each heart for each block you want to make. You begin by sewing small heart on top of the medium, then sewing this unit on top of the large heart, and then sewing this onto your applique background.
This is rough edge applique, meaning that you don’t need to prep the pieces to turn the edges and you don’t need to hide your stitches. You just sew around the rough edges of each shape, about 1/4″ in from the edge. After completing your blocks, you cut each one into fourths. Then you randomly select 4 pieces and sew them back together as a new heart. I really enjoyed this project, and it’s a great for people who are just learning how to quilt.
I haven’t quite decided how to quilt this yet, because I don’t want to quilt over the hearts. When this is washed, the rough edges will ravel and the hearts will look like they have a bit of a ruffle or fringe around the edge. It’s a nice effect for something like this.
Keep it thimble!
Goals for 2011!
Happy New Year!
Well, it’s time to kick of 2011 at Keep It Thimble! I wanted to have a great new project to share with you today, but I had a Wool Crazy emergency! I took the block with me on the road over the Christmas holidays so I could finish basting down the wool appliques. I only had a few more left – they were all cut out, they just needed to be stitched down. When I got home, some of my appliques were missing – I’d left them in the hotel!! Long story short, I spent yesterday recreating the missing appliques and stitching them down so I wouldn’t lose them again. This was a blessing in disguise, as I’ve been missing to finish the applique part so I can get started on the crazy quilt stitches. Now this project is more portable and I won’t lose anything – as long as I don’t misplace the entire block :). Here’s how it looks now:

2011 Goals
Big plans are in the works for 2011. Here’s a brief overview of what you can expect this coming year! I appreciate everyone who reads my blog and I look forward to sharing more with you this coming year:
- More free patterns
- More tutorials
- More giveaways
- More book reviews
- Guest bloggers
- Etsy shop
Finally, here are some fun stats about Keep It Thimble that were sent to me by WordPress (my blog host).
Keep It Thimble – 2010 in Review
A Boeing 747-400 passenger jet can hold 416 passengers. This blog was viewed about 10,000 times in 2010. That’s about 24 full 747s.
In 2010, there were 61 new posts, growing the total archive of this blog to 81 posts. There were 124 pictures uploaded, taking up a total of 232mb. That’s about 2 pictures per week.
The busiest day of the year was August 20th with 326 views. The most popular post that day was Free Pattern – Shaker Pincushion.
Where did they come from?
The top referring sites in 2010 were sewing.patternreview.com, craftster.org, libertyrosepatterns.blogspot.com, pumpkinpatchprimitiveswoolcrazy.blogspot.com, and facebook.com.
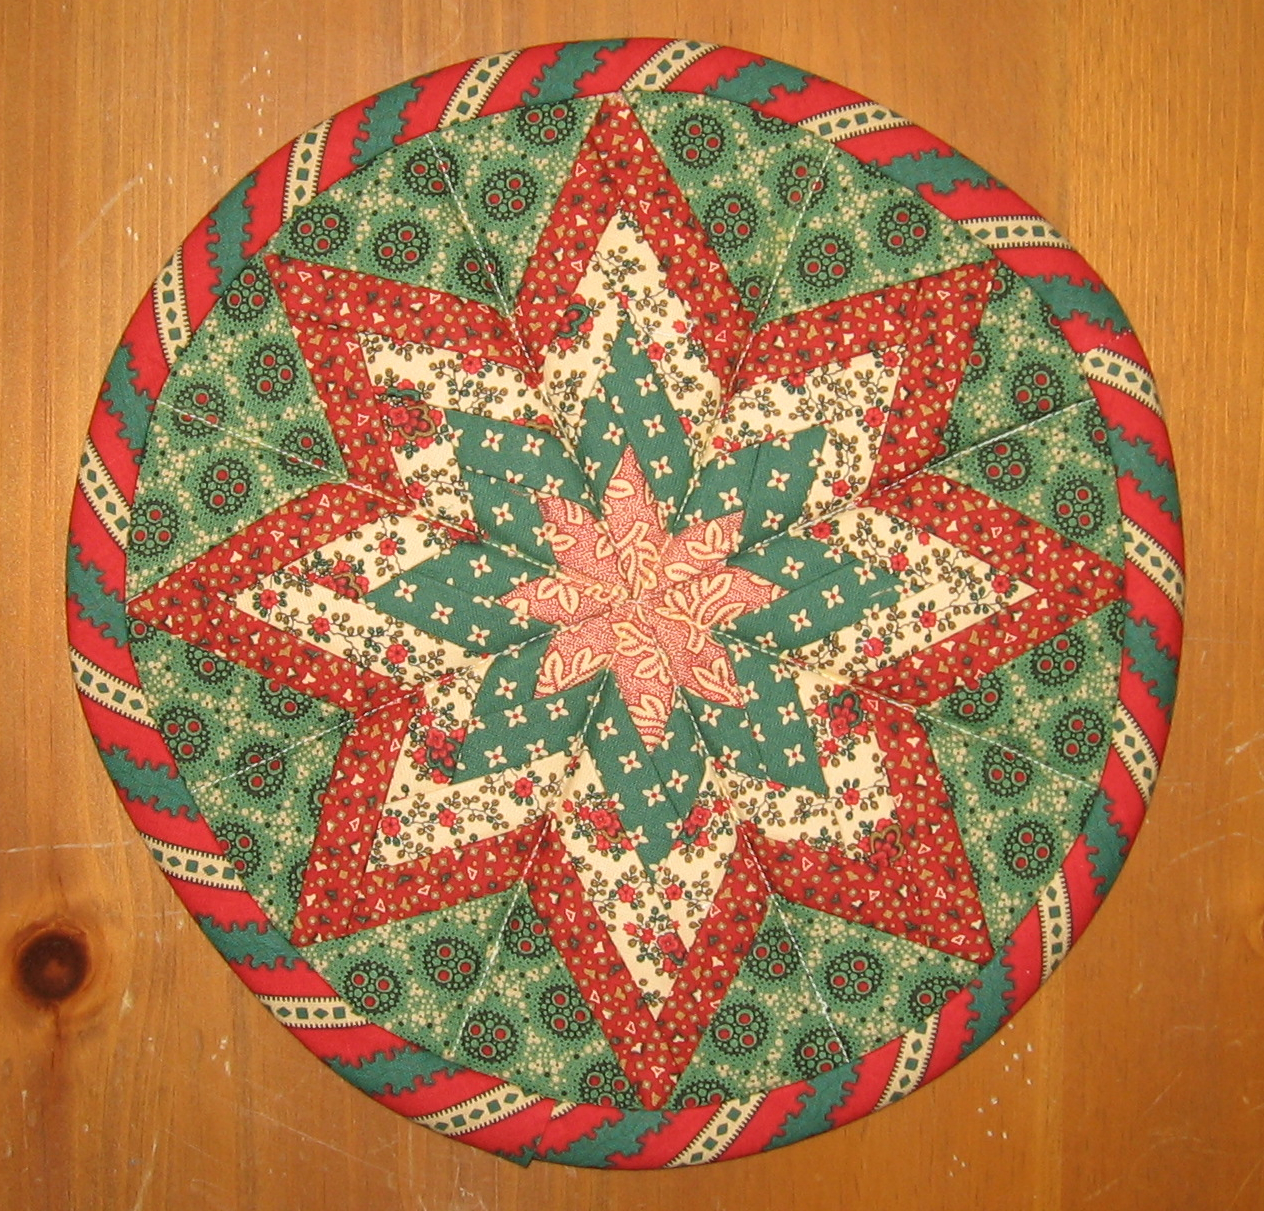
Some visitors came searching, mostly for folded patchwork, patchwork, folded star patchwork, wool crazy, and folded star.
Attractions in 2010
These are the posts and pages that got the most views in 2010.
1
Free Pattern – Shaker Pincushion January 2010
6 comments
2
Free Pattern – Folded Patchwork Star December 2009
5 comments
3
Free Patterns October 2009
4
Free Pattern – Stuffed Sea Creature Toys April 2010
5 comments
5
Grommet Purse August 2010
4 comments
Sewing Crow Purse
Here’s a project I started over 2 years ago (!) that I finally finished. I saw this purse in an issue of Quilt Sampler – it was in a photo of one of the shops that was featured – and fell in love with it! Through the power of the internet, I googled “Sewing Crow” and quickly found the pattern by Kindred Spirits

I picked some bright colors for the applique, and when I was done stitching I sprayed the piece with distressing spray (walnut crystals mixed with water) to tone down the colors and give it a more aged look. I am very happy with the results. The handles were painted a glossy black, and two buttons were added for decoration. I will paint some gold stars on the handle, and also make a small wool strawberry to hang from one button, and find a little pair of scissors to hang from the other. Then it will be the perfect sewing bag!
The bag is roomy – the finished size measures about 12 X 15 – so it is big enough for most any project you want to take on the go. You can easily fit a full-size pattern, several yards of fabric/wool, and other accessories. I used a nice piece of orange Jo Morton fabric for the lining, and added two interior pockets (one in yellow and blue – Jo fabric of course).
I briefly considered embroidering something on the other side (“Keep it Thimble”), but instead opted to finish it up for now just to get it done! I can always go back and add the embroidery later. I’m so happy to finally have this finished! Are there any projects you’ve been meaning to finish – pull out one of them and see if you can finish it before the end of the year :).
Happy Thanksgiving!
Hope everyone has a great turkey day!!!

This is the wool applique table runner I started working on last year. This is from one of the Need’l Love books that features fall patterns. I added acorns and oak leaves for that extra touch.

This guy wanted to have his picture on the blog too! He is the cousin to the other owl I made. My son has named this owl “Fancy” and the other owl is called “Sooder” (not sure how he came up with that one!).
Wool Crazy – Making Progress
I have been working on my crazy block on and off for about 2 months and I’ve made a lot of progress. Here is the original foundation I made about 2 months ago. I knew I wanted to feature holidays on my first block, so I picked all kinds of spring, summer, fall colors so that I could display this year-round.

Here is the “rough” layout of my main appliques. Some pieces seemed to naturally fit (like the flag and the snowman), but I was having a hard time figuring out how to place the rest of them. After playing around with these a few days, I decided I needed to switch out some of my foundation colors so the appliques would show up better.

Here is the “refined” layout. I added in some darker backgrounds and settled on the final placement of my main appliques. For the center area, I plan to embroider a big bunch of flowers in the jack-o-lantern and maybe add some bats, candy, etc.

I eventually plan to include some smaller appliques such as chicks and flowers. My plan is to stitch these down, and then go back and start doing all my embellishing. I’m sure that will take some time, but I look forward to it!
I’ve Gone Wool Crazy!
Wool Crazy is sweeping the nation! JoAnn Mullaly’s book, Wool Crazy has inspired many mild-mannered people to start cutting up their wool skirts in order to get material for their crazy quilt blocks!
I saw this book a few months ago, and was really impressed with the color and chaos of this quilt. When Sharon of Liberty Rose decided to teach this as a class, I signed up without a second thought. The bonus part of taking a class with Sharon is that you get to go through her wool stash – so I knew I would be able to create the perfect background for my crazy block:
You start off with a 25″ square piece of batting and muslin for a foundation, and then start adding pieces of wool, working from the center out. First, the pieces are pinned onto the foundation, and when all the pieces are laid out, each one is stitched down with a tack stitch (in a neutral thread). This makes it a lot easier when you add the appliques and finish it up with crazy quilt stitches, so you end up with something that will look like this (photo is from JoAnn’s original quilt):

The theme for my first block is going to be holidays, which is one reason why I selected so many different types of colors. The background needed to compliment holidays of all seasons (not just fall and winter). It took about 4 hours for me to place the wool pieces (this includes the time I spent digging through Sharon’s stash), and then another 4 hours to stitch the pieces down. Now that the hard part is over, the fun will begin. There are already have plans to make at least one more block (and possibly 3 more so I can have a quilt). Pictures will be posted each month of my project – so be sure to check back!
